Thursday, July 31, 2008

Play Time Over

Photobucket

So I am back from Vacation. I had a great visit with my friend in Virginia but was ready to come home. I am sure that it did not have ANYTHING to do with the fact that she has 4 children between the ages of 1 and 8. Not that I don't adore them, but at one point I looked at her smiled and said. "You know, this time next year I will be sending my youngest off to college." I can't repeat her reply here, but use your imagination. I am sure you will be close.

Photobucket

Photobucket

My computer, after spending a week in the hospital with a bill to reflect that (I know Franco, you can build me a new one) is finally up and running again. Sigh of relief. Though I have a love/hate relationship with it...I missed my "stuff" I not only was not able to get to my files and pictures to properly write this blog. I found that I am very dependent on the computer in my day to day cooking. I swear, I cooked before I had one but for the life of me I cannot figure out how. Cookbooks you say? How Archaic!

But I promised you something tasty when the world was right again. (OK, well perhaps just back to my twisted norm) and I am here to deliver.

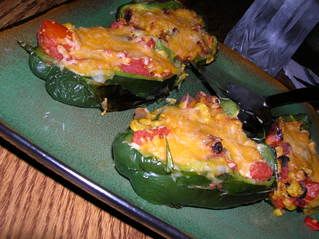
This is a take on a Rachel Ray recipe that I have made several times. You may have noticed pictures of it on the edges of other dishes I have made for you but I have never actually posted this particular recipe and I am not sure why because it is really VERY good and pretty healthy as long as you use the cheese judiciously. Her original recipe was a meatless dish. I have done that as a side dish and it was very good: but, for a main dish, I like to add cooked shredded chicken.

Don't be afraid of the Pablano Peppers once the seeds are removed they are not hot at all. If you are still timid you could just as easily use Bell Peppers instead. Feel free to spice this up with more (or less if you like) Jalapeno.

Charred Chili Relleno
4 large poblano peppers
3 cups frozen corn kernels
2tablespoons vegetable oil
1 red onion, chopped
1 jalapeno, seeded and chopped
4 cloves garlic, chopped
1 (15-ounce) can fire roasted diced tomatoes, drained well
1 1/2 teaspoons ground cumin
1/2 teaspoon dried oregano,
Salt and freshly ground black pepper

1 lime zested and juiced
1 cup shredded Cheese (I used a cheddar-jack blend)
1 cup cooked shredded chicken (optional)
Place poblanos under broiler or on hot grill and char (turning over half way through) about 15 minutes.

Defrost frozen corn and dry by spreading out on clean kitchen towel. Heat 2 tablespoons light oil in a skillet over high heat. When the oil smokes or ripples add corn, onion, jalapenos and toss until the vegetables char at edges and onions are tender, 4 to 5 minutes. Reduce heat to medium-high and add in garlic, fire roasted tomatoes and season with cumin, oregano, salt and pepper. Add shredded chicken (if using) Cook another minute or 2 then turn pan off.

Sprinkle the lime juice and zest over the corn mixture.

Split the charred peppers open but not in half with small sharp knife then scoop out the seeds with a small spoon. Place peppers in a shallow baking dish and stuff each split pepper until cheese is bubbly and beginning to brown.

Monday, July 14, 2008

Trifles and Tribulations

Photobucket

About a year ago I made a lovely Trifle to take to a dinner party. Unfortunately, there was a horrible food tragedy enroute to the party and the Trifle ended up on the floor board of my car. I decided then and there that I would never again make a Trifle unless I would be serving it at the same location that it was made.
Just a few facts about Trifles- They are Top heavy. They are Bulky and I don't know anyone who has space for them in their refrigerator. The make a HUGE mess when spilled in your car!

However, a few months ago I got a package from my Mother that changed my life forever! Ok, maybe I am exageratting just a little but I was VERY excited when I found inside the most AWSOME Trifle bowl ever! The pedestal and bowl actually separate and if that isn't enough to make me jump up and down and clap it has lid too! I know, I know, I get WAY too excited about this kind of stuff but let me tell you when you put the time (and money) into making a beautiful dish and instead of getting to present your lovely concoction to the hostess and bask in the praise of OHH's and AHH's and MMM's you have to show up to a dinner party empty handed and spend the next week cleaning custard and whipped cream out of your car (and on every hot day for the rest of the summer you realize you can"t REALLY get whipped cream and custard of carpet), well ....

Now let me start by saying that no one needs a recipe for a trifle. You have cake layers custard or pudding layers whipped cream layers and you can have fruit and/or jelly layers. You can moisten/flavor your cake layers with juice or liquers if you please. So, go crazy, use your imagination! It will be yummy and beautiful!

I have made two trifles in the last couple of weeks. The first was a Peach Melba trifle (similar to the one that haunted me every hot day until I traded my car in last week) and a Blueberry Delight Trifle which only became a trifle when I put it in a trifle bowl. I usually make this in two layers in a 9x13 pan. So if you don't have a trifle bowl you can make it like that and trust me it will tastes EXACTLY the same!

Photobucket

Peach Melba Trifle

4 peaches peeled and cut into slices
1/4 cup Grand Marnier
1 pint of fresh raspberries
4TBS Water
1 1/2 cups seedless raspberry jam
1-16oz pound cake cut into 1/2 in slices
1 large pkg instant french vanilla pudding prepared as directed except replace 1/4 cup of milk with 1/4 cup of Grand Marnier .
1-16 oz container of whipped topping (thawed)


Place layer of pound cake in bottom of trifle bowl. Mix 2 tbs water with Grand Marnier and brush onto pound cake with pastry brush.
Spread 1/2 of jam mixture onto cake, Spoon 1/2 of pudding mixture on top and a layer of peaches and raspberries Repeatlayers arranging fruit in a pretty pattern (I tossed in a few blueberries) Chill for 1 hour
NOTES: You can replace the Grand Marnier with apple juice or orange juice to moisten the cake and make the pudding as directed on package.


Photobucket

Blueberry Delight

1 pkg Cream Cheese,room temp
16oz container whipped topping thawed
1 cup powdered sugar
2 (Bar type) Angelfood Cakes
2 10z can Blueberry Pie filling

For ease of cutting place the angel food cake in the freezer for a couple of hours (not required but you will thank me). With electric mixer mix Cream Cheese and powdered Sugar. Fold in Whipped topping and mix just until incorporated (don't over beat). Slice cake into 1inch slices and place 1/3 into trifle bowl. Spread 1/3 of the mixture over cake, Spread 1/3 pie filling on top Repeat for 3 layers. Chill for 1 hour.

Wednesday, July 02, 2008

Thai Thai Again


Today's post was inspired by my abundance of Basil which is definitely a good thing because I LOVE basil!

I was looking for a recipe that called for a healthy amount of basil because the more you harvest your basil the better it grows and in case you didn't catch it before, I LOVE basil! Like I mentioned in a previous post, if you don't regularly snip it off it will begin to flower and then will go to seed and it's down hill from there. It will also get tall and lanky which you don't want either.

I found this recipe on Recipezaar and it is SUPER simple and very very tasty. I am excited to share this recipe with you because with the exception of just a few basic ingredients you can change just about anything in this recipe to suit your taste or ingredients you have on hand and honestly I don't think you could make it taste anything but wonderful. This goes together in minutes and I am not exaggerating one bit. It has taken me this long to post this for you because I made it 4 times before I managed to get pictures of it (which by the way do not even begin to do the flavor justice). It gets gobbled up THAT fast!

I am going to Post the recipe for you as it was written and then I will tell you all of the variations that you can make though I strongly encourage you try anything that sounds good to you.

Thai Chicken Fried Rice with Basil - Kao Pad Krapao

SERVES 2 -3

2 tablespoons vegetable oil
3 cloves garlic, minced
1 tablespoon chopped fresh Thai red chili peppers
8 ounces boneless skinless chicken breasts, cut into bite-size pieces*
2 cups cold cooked rice
1 tablespoon sugar
1 tablespoon fish sauce
1 tablespoon soy sauce
2 tablespoons chopped shallots
1/3 cup Thai holy basil (regular basil ok)
1 tablespoon chopped fresh cilantro

In a wok or large skillet, stir-fry garlic in oil until golden; then add chilies and chicken and stir-fry until chicken is cooked.
Add rice, sugar, fish sauce, and soy sauce, and stir-fry, mixing gently.
When well mixed, add shallots, basil leaves and cilantro; cook another minute or so, and serve.
If you desire, serve with lime wedges, chile sauce, fish sauce, or soy sauce at the table.


The variations are nearly endless. First of all, I used quite a bit more basil than this recipe called for probably more like 1 cup. I also cut my chicken into a very small dice (1/4 inch). If you do this when the chicken breasts are still partially frozen it is quick and easy. I prefer Tamari (over regular soy sauce)which is a strong dark soy sauce, but becareful because it has a bit more of a salty flavor you may want to adjust the amout.

I have replaced the chicken with ground beef. I have replaced the thai chilli peppers with 1 TBS of red chilli flakes. I have made it without any peppers at all (for my wimpy daughter) and I have made it without the cilantro (it was fine but I would recomend using it because it adds another layer of flavor). Using ground chicken or ground turkey would make this dish come together even faster.

For the pictures I put it into Endive leaves and that makes for a nice presentation and would make a great Hors d'oeuvre. My friend Savanna suggested using it in a lettuce wrap either with or without the rice (which I am going to try soon). I think it would also be great in a fresh spring roll (maybe even bulked up with a bit of shredded nappa cabbage).

My point is, make this however you like.Just make it. I promise, you won't be sorry!

Wednesday, June 25, 2008

I WANT To Be a Rebel

Photobucket

I know that a lot of people don't care for Rachel Ray and personally I could live without quite SO MUCH of her around. I have to admit though, she was the one who really turned me on to The Food Network. This was before cooking and celebrity chefs and what not became so trendy. I don't consider myself a nonconformist but I hate to feel like I am following the masses. I want to believe that I am doing (or can do) something that not EVERYONE else is doing. So I find it frustrating when I find something I like or I am good at and then suddenly everyone else is doing it too. I want to feel special ...sigh!

ANYWAY! Once again I have gotten off track. Regardless if Rachel Ray is annoying or over exposed I have really learned tons of things from her. If you ever watch her she often reminds you that lots of what she does is just a basic method for making something and it is easy to make it your own. Hopefully without being quite so annoying, my cooking style is pretty similar to hers. No measuring, little baking, a few convenience foods mixed in with really fresh stuff where it counts and though I think her stuff takes a bit more than 30 minutes for the average cook, I prefer meals that do not take an extraordinary amount of time to make.

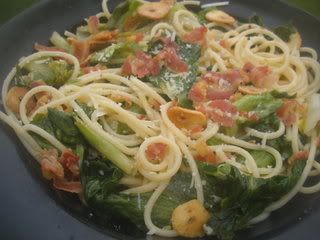
This dish is the first thing from Rachel Ray that I ever made. I follow her original recipe pretty closely because really it is super easy. The only substitution that I make is sometimes I replace the Pancetta with bacon. It is a dish that easily can be made in 30 min and it's really filling and quite tasty! I was surprised at the texture of the escarole after cooking it keeps just enough crunch to give it a great texture!

The only part I find difficult is the garlic chips which are extremely easy to overcook and then become bitter. But I would definitely NOT leave them out they give this dish that little extra something that makes it special. Just cook them on very low heat, watch them VERY closely and remove as SOON as they get a hint of color.

Spaghetti with Pancetta, Escarole and Garlic Chips Recipe courtesy Rachael Ray

1/2 pound dried spaghetti
Salt
3 tablespoons extra-virgin olive oil
1/4 pound thickly sliced pancetta, chopped
6 to 8 cloves garlic, thinly sliced
1 teaspoon crushed red pepper flakes
2 large heads escarole, washed and drained, roughly chopped
3/4 cup chicken stock or broth, eyeball it
1 lemon, zested and juiced
Freshly ground black pepper
3 tablespoons butter
1/3 cup grated Parmigiano-Reggiano, a couple of handfuls, plus some to pass at table


Fill a large pot with water, bring to a boil and salt the water. Add the pasta and cook to al dente, with a bite to it.
While the pasta is working, heat a large skillet over medium heat with the extra-virgin olive oil, 3 turns of the pan. Add the pancetta and cook until crisp, about 2 to 3 minutes. Remove the pancetta from the skillet with a slotted spoon to a paper towel lined plate to drain. Ser aside. Turn the heat on the pan back to low then add the sliced garlic and cook until golden brown, 4 to 5 minutes. Remove the garlic chips from the pan to drain alongside the crispy pancetta, reserve. Turn the heat up to medium again, add the crushed red pepper flakes and cook for 30 seconds. Add the roughly chopped escarole, tossing to wilt it in the flavored oil and wilting it into the pan in stages. Once all the escarole has fit into the pan, add the chicken stock, lemon juice, salt and pepper and cook for 2 minutes.
Drain the hot pasta well and add it to the escarole pan. Add lemon zest and toss to distribute. Turn the heat off and add the butter and cheese, toss to melt. Toss in the crispy pancetta and garlic chips. Serve the spaghetti with more cheese to pass at the table.

Notes: I also skipped the butter (though inadvertently) I can see where it would add great flavor but I did not really miss it.

Friday, June 20, 2008

Want S'more Pie?

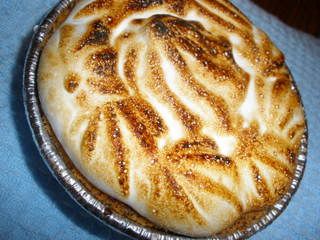
S'mores Pie


No, this is not a blog about redneck translations I promise! It is also not for the faint of heart or...sweet tooth. This recipe is RICH and VERY sweet! Diabetics, consider yourself warned!

I found this recipe on Smitten Kitchen. Her recipes are always amazing and her pictures are Beautiful! She is also a "real" baker, unlike me. She made every part of this pie from scratch from the actual graham crackers for the crust to the marshmallow topping. Now I have made home made marshmallows before but I draw the line at graham crackers. But for this I decided that the store bought versions would still produce a yummy finish although I am certain that Deb's version is far superior. Forgive me Deb but the filling is the only part I actually made from scratch and it is so ridiculously simple I could hardly believe it. If you are feeling especially creative and want to try your hand at the Real deal S'Mores Pie check out Smitten Kitchen. But if you are lazy like me this is pretty tasty too!

I opted to make single serving pies hoping it would help me to moderate my portion control a little bit. I also opted to use half and half instead of heavy cream which made me a little nervous thinking it might not set up right but it worked fine.
This is pretty simple. I did decided to pipe on the Marshmallow cream in order to give it some texture when the marshmallow was toasted. This was incredibly messy but I am pleased with the results. Spreading the marshmallow cream on evenly would also work just fine (and likely you could use quite a bit less cutting down a bit on the incredible sweetness). If you don't have a creme brulee' torch you could place them under the broiler for a few minutes but keep a VERY close eye on them.

S'mores Pie

12 mini Graham Cracker Pie crusts
16 oz Marshmallow Creme
7 oz of Bittersweet chocolate, chopped (I used Ghiradelli 60% Cacao chips)
1 cup Half and Half
1 egg at room temperature

Preheat oven to 350 degrees and place rack in center of oven.

Place mini pie crusts on a cookie sheet. Place chocolate into a bowl. Slightly beat egg in a separate small bowl. In a heavy sauce pan bring Half and half just to a boil. Pour over Chocolate and let stand for 1 minute. Whisk together chocolate and Half and Half then whisk in egg.
Ladle chocolate evenly into pie crusts. Bake for 15 min. Let cool for at least 30 min. Top with marshmallow cream. Brown topping to desired color with Butane torch or under broiler.

Notes: One deep dish Graham cracker crust could be substituted for mini crusts. Increase baking time to 20-25 min. (It will be still a little jiggly in the center but will firm up as it cools)
Spraying inside of piping bag and tip with cooking spray will make handling marshmallow cream easier to handle.

Tuesday, June 17, 2008

Christmas in June

Exotic Melons

Do you like Melon? Specifically, do you like Cantaloupe? Well, if you do, Get thee immediately, if not sooner to Harris Teeter and pick up a Santa Claus melon! WAIT! Make that 2 or 3 (I will explain that later).

GO! NOW! I will wait for you ...............................................tick tock,tick tock........ Lalala la, la la la, Lalalala LA LA LA . That was the Jeopardy theme in case you didn't recognize it. Wait, you are not here anyway.

Are you back? Did you get your melon? If you didn't, I am telling you, you are missing out!

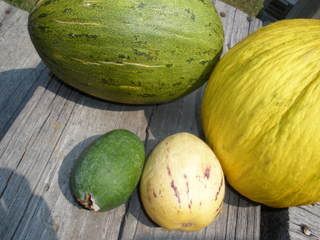
The other day I went into Harris Teeter and was checking out the "exotic fruits" section. They have a pretty good one and I love to try new stuff. When I noticed the produce clerk putting out some unusual looking melons. One looked sort of like a watermelon but was much smaller and sort of egg shaped. I asked her about it and she told me it was a Santa Claus melon. I asked her what it tasted like and she was unable to give me a description (obviously she is not a Foodie). She did say that they only get them once a year and that they were going on sale the next day. (Now I bet you are sorry you didn't go get one.)

So the next day I came back and bought a Santa Claus melon. I decided that I would do a taste test on few things and post them here for you because I am just that kind of girl (flashing a cheesy grin). I picked out a Casaba Melon which is yellow and shaped sort of like an acorn. A Pepino Melon (one of the exotic fruits) which is light beige in color with thin brown stripes and is very small (palm size). I also decided to try a Feijoa which is not a melon but a type of Guava, also in the exotic fruits section.


I will start with the ones I didn't care so much for. I was unimpressed with the Pepino melon it had a very mild almost watery flavor it likely won't be something I buy again.

The Casaba melon had a stronger flavor but to me had a very "green taste" sort of grassy. I definitely won't try that one again.

On the other hand I loved the Feijoa again this one is not a melon but just sounded good to me. This is a small egg shaped fruit that is green in color. The flesh is very sweet and is a combination of a pineapple, strawberry and of course guava flavor. This one was a hit! This is eaten by cutting in half and scooping out the flesh. When I was doing research for this also read that the skin can be eaten and is slightly bitter complimenting the sweet fruit. I might try that next time. The Feijoa when ripe gives slightly when you press on it similar to a ripe avocado.

Santa Claus Melon

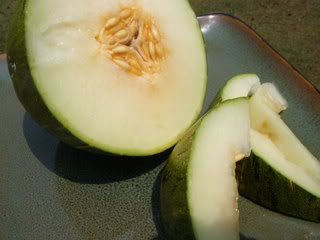
Last but not least was the Santa Claus melon. The inside flesh is light green and resembles a honey dew. The flavor is sweet and has the essence of cantaloupe mixed with watermelon. But WAY better than either by itself. This is by far my favorite melon. I am very sad to find out they are only sold once a year! BUT, here is a cool thing I found when doing some research. They can be stored uncut for several MONTHS! That's right I said months. Now excuse me I need to run out and buy a couple more before they are gone!

Monday, June 09, 2008

Herb- A-Licious

Photobucket

I have a warning for you! I am going to tell you right now that I planted an herb garden a few weeks ago and it is doing FABULOUS! Do you know what this means? It means that you are going to be inundated with recipes that feature fresh herbs!

Now I love plants but I do not have a particularly "green thumb." I have absolutely NO houseplants because I kill them. Even my "lucky bamboo" died which is supposed to be one of the easiest plants to keep. But I do much better with plants outdoors. The problem is that I HATE(!!!) to weed and occasionally I forget to water. The first issue is solved by planting a "potted" garden. Which is what I have done on my back deck. The second...well we will just keep our fingers crossed. The fact is that I use some kind of herb (when I have them readily available) nearly everyday. So, if I use them I generally check to see if they need water at the same time.

I highly recommend planting your own. I get bedding plants from one of the local nurseries and I have not had any issues with any of them. Even Walmart sells them though the ones that I have gotten there do not seem quite as hearty. Think about the herbs you love most and plant one or two. For the price you pay for 1 package of grocery store herbs you will always have the freshest on hand and you will likely (much like me) begin putting them in EVERYTHING you cook. It is SO cool to go out your back door and cut the fresh herbs you need for a meal!
Photobucket
These are the herbs that I currently have growing and all are hearty and easy to grow.
Basil (my most favorite), Chives, Rosemary, Thyme, and Oregano. I still would like to get some Parsley (which I have never tried to grow before) and Sage.

The only thing that I have not had luck with was Cilantro. That makes me sad because I use a lot of cilantro and would love to be able to snip it whenever I need it. It does fine for a while but as soon as it gets really hot it goes straight to seed and then dries up and dies. I am thinking about maybe trying it on my front porch this year where it does not get so much direct sunlight. My friend Karen, who grows a good sized organic Vegetable garden in her backyard, says that she has also had problems with Cilantro and she has found that fall is a better time to grow it.

The key things to growing potted herbs:

Plenty of water: Sometimes in the summer when it is very hot and dry they need to be watered twice a day.

Pinch back plants regularly to encourage full bushy growth instead of tall and lanky. Basil in particular will quickly flower and then go to seed and then the plant will not produce many leaves. For this reason along with the fact that I plant a lot of basil you will probably get your fill of basil recipes this summer (I already have 2 ready to go).

If you feed your plants (which I do about once a week) be sure that you are using a fertilizer that is intended for fruits and veggies. I have had great luck with Miracle Grow. Remember to mix it at a strength for houseplants if you are feeding potted herbs as not to burn the roots.

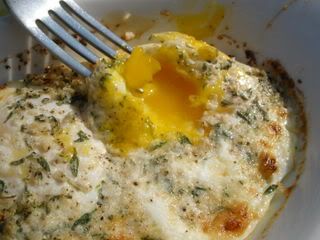
So here is the first dish I have for you that features ingredients from my herb garden. I have made this 3 times now and though it is very tasty I have not yet gotten the timing down for how long to cook it. I found this recipe on a Blog called Columbus Foodie I made a few minor changes to it because I did not want to eat 3 eggs and I did not have any parsley so I substituted Chives. Other than that I am still working on the Broiling time. The recipe says 6 min under the broiler but this produces a very hard cooked egg and I like mine over medium. I tried 4 mins and this was still too long. Today I tried 3 mins and the yolks were the way I like them but the whites were not quite done enough. I definately think 3 1/2 mins should do the the trick. Enjoy this decadent but really simple breakfast!

Photobucket

Herbed-Baked Eggs
recipe adapted from Ina Garten

1/4 teaspoon minced fresh garlic
1/4 teaspoon minced fresh thyme leaves
1/4 teaspoon minced fresh rosemary leaves
1 tablespoon minced Chives

1 tablespoon freshly grated Parmesan
4 extra-large eggs
2 tablespoons heavy cream
1 tablespoon unsalted butter
Kosher salt and freshly ground black pepper
Toasted French bread or brioche, for serving

Preheat the broiler for 5 minutes and place the oven rack 6 inches below the heat.

Combine the garlic, thyme, rosemary, chives, and Parmesan and set aside. Carefully crack 2 eggs into each of 2 small bowls (you won’t be baking them in these) without breaking the yolks. (It’s very important to have all the eggs ready to go before you start cooking.)

Place 2 individual gratin dishes on a baking sheet. Place 1 tablespoon of cream and 1/2 tablespoon of butter in each dish and place under the broiler for about 3 minutes, until hot and bubbly. Quickly, but carefully, pour 3 eggs into each gratin dish and sprinkle evenly with the herb mixture, then sprinkle liberally with salt and pepper. Place back under the broiler for 3-4 minutes, until the whites of the eggs are almost cooked. (Rotate the baking sheet once if they aren’t cooking evenly.) The eggs will continue to cook after you take them out of the oven. Allow to set for 60 seconds and serve hot with toasted bread.

Notes It is important to have all of your ingredients ready before you start cooking and to keep a close watch on them under the broiler.The butter can go from brown to burned in seconds. This seems like it would be a big pain but its only 5 mins (tops) and it's well worth it!

Wednesday, June 04, 2008

How To Be The Perfect Houseguest

Photobucket

This past weekend was jam-packed and playing catch-up this week has been the reason I have yet to write about it. I woke up Fri afternoon after just a few hours of sleep (been on night shift) and never stopped till Sunday evening when I fell into bed thoroughly exhausted. I am pleased to say that all of the craziness was purely fun! The highlight of the weekend was an overnight trip to Raleigh which included shopping, cooking for my friends and a night at a "real" night club for nonstop dancing! (Fayetteville is trying, but we still don't have comparable nightlife here)

Photobucket
Just like a posh hotel, only better


My friend Josh was an AWESOME host and it was my pleasure to cook dinner for him and my other friends (new and old) in appreciation for that. Nothing is better than enjoying a meal with friends and at someone's home is way more relaxing and intimate than a restaurant. I hate that I did not think to take some pictures of us eating but here we are dancing the night away.
Photobucket

The dish I decided to make is not very fancy but it has an unusual "can't quite figure it out" flavor that is much different from my usual (Mediterranean inspired) style. Though it does not photograph all that pretty, I assure you the flavor makes up for it. I served it with a plain brown rice and Balsamic roasted green beans. It was a hit and the perfect beginning to our evening on the town. I stuck pretty close to the recipe ( I will have to admit I don't remember from where originally got it) The few minor changes I made were just due to things I had on hand so I am going to post the recipe just as it was written.
Don't be scared of the jalapeno with the seeds removed it does not make this dish spicy at all. It just adds another layer of flavor to the dish. Of course if you like spicy then feel free to up the jalapeno.

Photobucket
African Chicken in Peanut Sauce
Adapted from "The Oprah Magazine Cookbook"
Serves 6
Spice Rub:
3/4 teaspoon salt
3/4 teaspoon ground black pepper
1 1/2 teaspoon chopped garlic
1 1/2 teaspoon onion powder
3/4 teaspoon ground cayenne pepper

Chicken:
4 pounds bone-in chicken pieces, skin removed
3 tablespoons vegetable oil

Peanut Sauce:
1 small onion, finely diced
1/2 red bell pepper, seeded and finely diced
1/2 green bell pepper, seeded and finely diced
1 medium carrot finely diced
1 garlic clove, minced
1 teaspoon finely diced and seeded jalapeno chili
4 cups (32 ounces) chicken broth
1/2 cup smooth peanut butter
1 tablespoon tomato paste
1/2 tomato, seeded and diced
1 teaspoon chopped fresh thyme leaves (or 1/2 teaspoon dried)
1/2 teaspoon peeled, grated fresh ginger
1/2 cup well-mixed coconut milk
1/2 teaspoon salt
1/4 teaspoon finely ground black pepper

1/4 cup chopped parsley, for garnish

1. Stir together the spice rub ingredients and rub onto chicken pieces.

2. Heat 1 tablespoon oil in a large nonstick skillet over medium-high heat. Working in batches, add half the chicken and brown on all sides, taking care not to burn the spices. Transfer browned pieces to a platter and set aside. Brown remaining chicken and transfer to platter.

3. With a paper towel, wipe skillet dry; then add remaining 2 tablespoons oil. Add onion, red and green bell peppers, carrot, garlic, and jalapeno chili. Cook until vegetables are soft, about 5 minutes. Add chicken broth and simmer until reduced by half, about 20 minutes. Reduce heat to medium-low, stir in remaining sauce ingredients, and simmer 2 minutes. Return browned chicken to skillet. Cook 25 to 30 minutes, or until chicken is tender and cooked through, stirring frequently to prevent sauce from sticking. Turn chicken pieces over midway through cooking time. Garnish with parsley.

Thursday, May 29, 2008

Flavor of the Week


I have a new favorite food! Next week I will probably have another new "favorite food" and likely another one soon after that. I just love to try new stuff! When I try something I like there is probably a pretty good chance I will eat it again very soon and I wouldn't be surprised if few days later (sometimes even the next day) I eat it a third time.

Some of the reasons that this is my new favorite food are:
1. It is healthy and pretty low in calories which means I can eat a LOT of it. (this always makes me happy).
2. It has bold spicy flavors.
3. It is really yummy! (the most important thing)

So this new obsession started about a week ago when I went to my favorite Thai Restaurant and ordered the Thai Beef Salad. One bite and I was in LOVE! (perhaps it was only lust, but regardless...) I asked the owner what was in the dressing and more importantly did it have much oil? She told me it had NO oil! OK, that just made it 10 times better!

Two days later I was craving Thai Beef salad again. I arranged my entire afternoon around picking up one on my way to work that night. But when I called the restaurant to place the order (perfectly timed to swing by on my way to work) they told me that there was an hour and 30 min wait for orders! WHAAAAT? You are kidding me? On a Thursday night? This did not make me happy! I tried again Fri night and was told that it would be 45 min. Still not fitting into my schedule.

It seems my favorite Thai Restaurant is suddenly lots of peoples favorite Thai restaurant. They have always been busy but never THIS busy! So, out of necessity and my cravings, I began a search for a recipe.

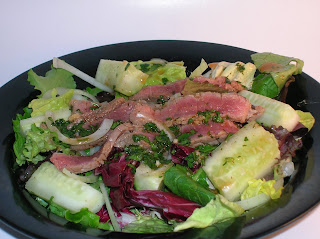
So the main elements of all the recipes was Lime juice, and spice. What I liked about this particular recipe was that you actually marinated the meat in some of the dressing. Many of the recipes didn't marinate the beef at all or had a different marinade for the beef. Does it taste like the restaurant? Well, not exactly and I am not quite sure what is different (I will have to eat it there again to figure it out) but it is still really good. One thing I do like better about making it at home is that (at the restaurant) it is made with just iceberg lettuce which is NOT my choice of lettuce. So making it at home give you the opportunity to use more flavorful (and more nutritious) greens.
If you have never had Thai food be warned, it is H-O-T! I used 2TBS of Sriracha (hot chili sauce) I have changed that in the recipe to 1TBS because my mouth and Lips were ON FIRE! Now, I am not a wimp when it comes to spicy stuff. I like things hotter than the average person so I would recommend judicious use of the Sriracha if you are not big on spice. (but you need some spice otherwise it will not be the same dish) You could also substitute chili paste or red pepper flakes if you can't locate Sriracha. This is great served with white rice (preferably the sticky kind like you get at Asian restaurants). The rice is also good for cooling down your mouth down!

Thai Beef Salad
1/2 cup fresh lime juice
1/4 cup choppedfresh cilantro
2 tablespoons brown sugar
2 tablespoons Thai fish sauce
2 tablespoons Rice Vinegar
1 tablespoon Sriracha or chili paste
2 garlic cloves, minced

16 oz flank steak, trimmed

1 1/2 cups sliced red onions
4 plum tomatoes, each cut into 6 wedges
6 cups lettuce/greens
1 large cucumber peeled and cut into large chunks


Wisk together first 7 ingredients together to make dressing. Place steaks and 1/4 of dressing in a zipper type bag and let stand for 1 hr. Broil or grill steaks until med-rare. Let steaks rest for 5 mins and slice as thinly as possible. Arrange Greens, cucumbers, onions and tomatoes then top with beef slices. Pour remaining dressing over top. Toss before serving.
Serves 2 (with some left over steak unless you really pile it on)

Tuesday, May 27, 2008

The Sandwich without a Soul

I could TOTALLY be a Vegetarian! If only it wasn't for that "you can't eat meat" rule. I could be a part time vegetarian. Say 5 out of 7days, maybe 4 out of 7 if you count fish/seafood as meat although I was told fish don't count because they don't have souls (really? Fish don't have souls? Hmmm). Someone else says you can't eat anything with eyeballs...some seafood does not have eyeballs. What do eyeballs have to do with it anyway? UNLESS they are referring to "the eyes are the window to the soul." Does this mean if you don't have eyes you don't have a soul?

OK, OK, I don't want to get in to a theological discussion here. All in jest, I promise! I get Vegetarianism. I respect those who are Vegetarians. I just choose not to practice it (at least not full time) even though I do have a smidgen of guilt about the treatment of animals. I LOVE ,LOVE, LOVE, Veggies but I can't give up a nice juicy steak once in a while and chicken is a staple in my diet. The other thing about a vegetarian diet is though I love vegetable dishes. You have to work a lot harder to make them satisfying as a main dish without even talking about trying to maintain a nutritionally balanced diet. Not an impossible task but it takes time and I don't always have that extra time.

But I digress! This time of year I begin getting excited by the increase of lovely (and hopefully more economical) produce that just gets better and better as we move towards summer. I was beside myself today when I went into the store and saw that wonderful tender young asparagus. I have SO been waiting for that! But, what I went there for was Portebello Mushrooms to make Portebello burgers. Now, I am no way trying to substitute this for a thick juicy (preferably a little rare though I know that is supposed to be a no-no) hamburger. I just REALLY like grilled Veggies!

This is very simple and you can pick and choose what ever veggies you like. This was lunch today for myself and my friend Savanna who could be my twin when it comes to food preferences (aside from her bacon aversion and allergy to nuts).We enjoyed this and I hope you will also!

Souless, Eyeball free Grilled Sandwiches

1/2 cup Balsamic Vinegar
1/4 cup Extra Virgin Olive oil
2 cloves garlic minced
3 TBS minced Fresh Rosemary
3 TBS minced Fresh Thyme
1/2 tsp salt
Fresh ground Pepper to taste

4 large Portebello mushrooms (bun size)
1 small eggplant
1/2 each red,yellow, green peppers
1 medium red onion
4 toasted Onion buns
4 slices Provolone cheese

Optional ( Do not grill)
Chopped sundried tomatoes
Chopped Artichoke hearts


Wisk together first 7 ingredients to make dressing/marinade and set aside. Remove stems from mushrooms and clean with a damp cloth. Place Mushrooms gill side up on a platter and spoon marinade (aprox 1 1/2 TBS each) over top allowing it to seep down into gills.(let marinade soak in while preparing remaining veggies). Peel eggplant and cut into about 1/2 inch slices. Cut top and bottom off of peppers, remove seeds and ribs then cut them lengthwise in quarters to make large flat chunks (so they won't fall through grates). Cut Onion into 1/2 inch (thinner will fall apart on grill) slices. Brush veggies with marniade. Brush inside of buns with marinade and set aside.

Place Mushrooms on med-hot grill, gill side up. Continue placing remaining veggies on grill (skin side down for peppers) Grill for 4-6 minutes until veggies begin to char. Turn Veggies over and cook for an additional 3-4 minutes. You want Veggies to maintain some of their crispness and not become too mushy.

Turn mushrooms gill side up and place a slice of provolone cheese on each. Place buns cut side down on grill.Begin removing remaining veggies to a platter. By the time you finish removing remaining vegetables the cheese should be slightly melted and buns nicely toasted. Slice peppers into thin strips and separate onion rings. Serve Veggies on a platter and allow each person to layer bun with veggies of their choice.

Notes: Place eggplant on the grill last and remove it first as it will cook the fastest. Pass extra balsamic vinegar, salt and pepper for those who like extra seasoning.

Friday, May 23, 2008

Retro-Style Chicken Casserole


Before you look at this recipe I want to assure you that I have not been brainwashed by Sandra Lee (Queen of short-cut cooking and being irritating). No, this recipe I got from Sandra Sue...AKA my Mother. This is a quintessential 1970s working mother's recipe. It's quick, easy, filling and tasty.

As a "foodie" I should be quite ashamed at posting this recipe I mean really, cream of mushroom soup? Processed CHEESE PRODUCT? Do you really consider this cooking? Well, depending on your definition maybe, maybe not but it was dinner on our table that I enjoyed eating so really, who cares? I also happen to harbor a deep affection for Velveta which makes the BEST grilled cheese sandwiches which I fondly refer to as Molten Lava Grilled cheese. Foodie snobs be damned, THIS is Yummy!

Molten Lava Chicken Casserole
(4-6 servings)

8 oz uncooked elbow macaroni
1 cup frozen baby peas
1 cup cooked chicken cubed or shredded
6 oz Velveta cheese cubed.
1 can cream of mushroom soup
1 cup chicken broth

Cook macaroni according to package instructions. Drain, mix with remaining ingredients. Place in a medium sized (8x8ish) casserole dish that has been sprayed with cooking spray. Microwave on high until cheese is melted through out (5-10 minutes) stirring once or twice during cooking.

Notes: I used lowfat cheese and fat free mushroom soup with great results. (Every little bit helps)
My mom (and actually I have been known to also) often used a can of chicken drained (similar to tuna which could also be substitued
You could bake this for about 15-20 mins in a 350 degree oven. In which case you could also top with some crushed cornflakes, breadcrumbs or if you REALLY wanted to go Retro crushed potato chips

Friday, May 16, 2008

Does This Qualify as Making Bread?


Despite my lack of baking skills I have tried several times to make bread. As you know I have yet to be successful at this. Frankly it is REALLY ticking me off!!! I am like a rebellious teenager (and believe you me I have experience with that) who is told she can't do something. I am determined that I am going to find a way to do it. That has been a life long struggle for me. The best way to get me to do something has always been to tell me I am not capable of it. But bread, it has been the one thing that consistently can KICK MY BUTT!

So, I cheated! Seriously you can't really call this "making" bread. But I put dough in my oven and it came out looking like a loaf of bread so we are going to call this making bread. Maybe it will silence my obsession ... at least for a little while.

This recipe is supposed to be "light" you would never believe that I saw it on an episode of Paula's Home Cooking. Really, Paula Deen made something low-fat!!! I am sure this would work just as well with full fat ingredients so feel free to substitute. This is simple, cheesy and good!

Poppy Seed Pinwheel Bread

1 (8-ounce) package light or fat-free cream cheese, softened

1 teaspoon dried parsley flakes

1 teaspoon dried chives

1/2 teaspoon garlic powder

1 can refrigerated crescent rolls

Cooking spray

1 egg, slightly beaten (or egg substitute equivalent)

2 teaspoons poppy seeds


Preheat oven to 375 degrees F.
In a small mixing bowl, combine cream cheese, parsley, chives, and garlic powder. Set aside. On a floured surface, unroll the crescent rolls into rectangles and combine to make 1 long rectangle. Spread cream cheese mixture on and roll up like a pinwheel, starting at the long side. Seal edges. Spray a cookie sheet with cooking spray. Place roll on the cookie sheet, brush with egg, and sprinkle with poppy seeds. Score at 1/2-inch intervals along the roll (not all the way through). Pull apart slightly so that your scoring will not completely seal back up during baking. Bake until golden brown.

Thursday, May 08, 2008

If Only It Could Mow The Lawn


Have I ever mentioned my that my life revolves around food? Seriously, a huge percentage of my free time is spent either looking at food in the form of blogs,TV show, cookbooks, or magazines. Preparing Food for my family, friends and sometimes events like weddings or parties. Eating food (no description needed). Then of course there is the going to the gym which is not directly dealing with food but is a necessary evil as a result of the previous. Oh wait, I do often watch the Food Network WHILE I am at the gym running on the treadmill! It is no wonder that I am single, who has time? Not to mention it would take a pretty amazing man to rival my passion!


My cooking occupies me, challenges me, gives me a feeling of satisfaction, earns me praises and comforts me. But it can also frustrate me and disappoint me. (See the similarities?)Frustrating me is what the recipe for today did.


It seemed simple enough, Pecan Encrusted Chicken Salad. The recipe I tried originally had an AWESOME flavor but as soon as you tried to cut the chicken all of the "crust" fell right off. So, it tasted good but did not look so pretty. I am firm believer that you eat with your eyes first so this would not "do." So I had to make it again the next day.


I felt what was missing from the recipe was "glue" to hold the crust to the chicken. While I was at it I wanted to tweak the recipe to make it a little more waistline friendly(Maybe if I can cut down some gym time I might have some time for dating) and a little less expensive (can you believe I paid 8 dollars for a bag of Pecans?). My result looked prettier but not quite as tasty as the original. So if fiddled with it a little more and I think I have found the middle ground between tasting good and looking good. What I love about this recipe is the surprising taste of cinnamon in the salad. You know me, I love that "Hmmm" factor!I did not however change a thing about the Caramel Vinaigrette that was with the recipe that I originally found on Vicarious Foodie (http://vicariousfoodie.blogspot.com/2008/04/pecan-crusted-chicken-salad.html). I think it compliments this salad nicely but if you are not up for making your own Vinaigrette then a nice bottled Balsamic or Raspberry Vinaigrette would pair nicely with it also.


Pecan Encrusted Chicken Salad

serves 4
Caramel Vinaigrette
1/3 cup caramel sauce (ice cream topping)
2 teaspoons water
1/4 cup lime juice
3 tablespoons lemon juice
1/4 cup olive oil
1 lime, zested
Salt and freshly ground black pepper
Microwave Carmel sauce about 10 seconds ot loosen it up. Combine the caramel sauce with water and citrus juices and whisk. While whisking, drizzle in olive oil, lime zest, and season with salt and pepper, to taste.


Chicken
2 large Chicken breasts (aprox 8oz)
1 1/2 cup buttermilk
Salt and Pepper to taste
1 cup pecans
1 cup flour divided
2 tsp cinamon
1 egg
1tsp water
2 Tbs vegetable oil

Field Greens or other lettuce mixture
1cup dried cranberries
whole pecans for garnish.

Split chicken breast in half then cut into aprox 1 inch strips (fingers). Place chicken and buttermilk in a ziplock bag and refrigerate for at least 2 hours (or overnight).
Place Pecans in food processor and grind to a fine consistency. Combine 1/3 cup flour, ground pecans and cinnamon.
Cover Baking sheet in Foil. Add Oil to pan and spread evenly.
Remove Chicken from buttermilk and let drain well then pat dry Salt and Pepper to taste.

Lightly beat egg and water together. Dredge chicken in remaining flour, then egg, then pecan mixture. Place chicken on Pan and bake for 15-20 minutes at 350 degrees. Let cool slightly( if desired cut into bite sized pieces) and arrange over greens. Drizzle Vinegrette over top. Garnish with Cranberries and Pecans.


Monday, August 20, 2007

New Home

MMM MMM good has a new home. I am currently writing a blog for the Fayetteville Observer. I am not sure if I am going to continue to post my blogs here also or not, but please visit me there http://www.fayobserver.com/blog?id=87

Sunday, July 29, 2007

Fire and Ice


Picky eaters drive me crazy (ie:my son)! I don't even mind so much if someone does not like something if they will just try it and then make that decision. I like to cook with what some people (not me) might consider somewhat unusual ingredients. This usually means some spices that they are not familiar with or combinations of foods that your basic Southern/Americana cook would not typically use. Because of this, when I make a new dish I am often faced with the dilemma..."do I tell them what is in it?" With my children the answer is usually a no. My policy is make them taste first and then disclose. Friends and acquaintances on the other hand are a little trickier.
I will have to say that most of my friends have a pretty open mind about trying new things and now after a few times of trying my new creations they have come to know that for the most part my cooking ROCKS (hey when you got it Flaunt it)! It also does not hurt that I have a disproportionately large number of male friends most of whom are Firefighters that subscribe to the ... If it does not eat me first philosophy. I also think it helps that due to the military, a lot of them are not Southern born and raised.

Now, no offense to my friends (or anyone else) who are not Damn Yankees (like myself). I am not knocking Southern cooking. Lord knows that I love to eat it. But I am not that great at cooking it. ( I can't make good fried chicken to save my life). What I am getting at is there is a simplicity to the ingredients of Southern Cooking and some people who have eaten it all their lives are resistant to try things they are not familiar with.

On of my favorite things is to mix sweet and savory. Even I had trouble with that concept at first but once I tried it I was hooked. Now I look twice at those recipes with combinations that even I have some doubt about. I try to think about the ingredients separately and then use some blind faith.

Today's recipe was one that gave me pause. I love salsa! I have seen recipes for Watermelon salsa several times over the past few weeks. Now I make a fruit salsa all the time but it is definitely a sweet salsa and I make cinnamon tortilla chips with it. But this is a Savory Salsa with garlic and jalapenos. At first I was like, ehhhhh that really does not sound too good. But then after seeing it a couple of more times I was intrigued. I found several recipes on Recipezaar along with several other sites that I googled. There are many variations and I took what I liked best from them to come up with this one. I kept the name from the one I followed most closely because I thought it described it perfectly "FIRE AND ICE SALSA" The cool watermelon with the hot jalapenos is a surprising combination. I debated telling my friends what it was before they tasted it because quite honestly when you look at it you can't tell it is not tomatoes. But in the end I did and they tried it anyway. As is typical with something unusual, it got a slow start with people tentative about it but by the end of the evening the huge bowl was nearly gone. How could they have doubted me?

Fire and Ice Salsa

3 cups diced watermelon
1/2 cup diced red onion
1/4 cup diced green pepper
1/4 cup diced red pepper
1-2 jalapeno peppers finely diced (adjust to taste)
1-2 cloves garlic finely minced
1 TBS Balsamic vinegar
1/4 cup finely minced cilantro
2Tbs finely chopped mint leaves
Juice of 1 lime
1/2 tsp. salt

Mix all ingredients in a large bowl. Cover refrigerate for at least 1 HR. Serve with tortilla chips. Also would be great over broiled fish. 24-48 hr. is about the extent of it's shelf life in the fridge but so far mine has not lasted that long anyway.

Note: Be careful with the jalapeno. The contrast of it with the watermelon makes it seem hotter. Error on the side of not enough to start with then you can add more according to your taste.

Monday, July 23, 2007

Sandwich Artistry


I saw this on an episode of Everyday Italian months ago and thought it looked amazing! I had been looking for an opportunity ever since to make it. I finally did on the 4th of July. It was a HUGE hit and I have made it twice since then. One time was for friends who came over to discuss a menu for their Wedding reception. (Yes, I will be make that for their wedding). I also made it last week and took it along to Fayetteville after 5 for my friends and I to munch on while listening to the beach music. Again it was a hit. You can absolutely use whatever cold cuts and cheeses in it you desire. I used spinach in it because I thought it would hold up better than other lettuces. You could also try arugala if you don't like spinach but I just didn't mention it to anyone (my kids) who does not like spinach and they did not even notice.Though I am not crazy about olives the flavor of them in this is irreplaceable. My personal twist on this was the pesto which I think adds a great flavor to it. I think next time I might even layer some basil in with the spinach ...mmmmmm basil! The bread is also something that can be whatever you like. Round and crusty are pretty much the requirements for that. The secret to this recipe is that it MUST be made 8-24 hrs ahead, wrapped tightly and refrigerated. This lets all those yummy flavors soak into the bread.

Muffaletta

1lb round loaf of Sourdough bread
1/4 cup of Olive tampenade
1/4 cup pesto
Spinach leaves
4oz sliced swiss chese
4oz sliced provolone cheese
4oz pastrami
4oz ham
4oz tukey breast
Thinly sliced Red onions
Thinly slice roasted red peppers

Carefully cut off about 1/2 in off top of Bread. This will become the "lid". With you fingers hollow out the bread leaving about a 1/4 inch wall on bottom and sides. Mix together Tampenade and Pesto. Spread 3/4 of mixture over bottom , sides and "lid" of bread. Place a single layer meat, cheese, tampenade/pesto, peppers, onions and spinach. Continue to layer ingredients alternating types of cheese. Continuely press down on ingredients packing them very tightly into bread. Replace Top of bread onto loaf. Wrap sandwhich as tight as possible with plastic wrap (press and seal is great for this). Refigerate sandwhich for at least 8hrs. Cut sandwhich into 8 wedges immediately before serving.

Thursday, July 05, 2007

In Spite of my Mother...


I have come to the conclusion that I LIKE tomatoes. Now this might not seem like any great epiphany to you but my MOTHER would certainly be shocked to read this. My WHOLE life I have said I hate tomatoes. When I was growing up mother (who would sprinkle salt on a whole tomato and eat it like an apple) always put tomatoes in our dinner salad and MADE me eat them. So, I would pick out the tomatoes and choke them down by themselves. Don't tell my Mom but, I actually would swallow them whole which I also did with peas (which by the way I love now) and lima beans. This would INFURIATE her. "If you hate them so much why would you eat them by themselves???" my reply, "I love salad. "
My answer was simple and I think, quite insightful for a small child. I wanted to enjoy my salad. Savor my salad. If I ate the salad with the tomatoes it would have ruined it. It is also further proof that I was a foodie even back then. I can also vividly remember the sausage pizza we had every Fri night (and cold pizza left overs for breakfast Saturday morning) from Jacks Pizza. It was just recently that I realized that the reason that I loved that pizza so much is that the sausage was perfectly spiced with loads of fennel seeds. SEE ... what 5 yr. old has such a distinguished palette?
I also have vivid memories of going to my Grandparents and my Grandpa giving me a glass of Buttermilk. Sprinkled with a dash of salt and pepper. I loved tang of the buttermilk and the feel of it coating my mouth. I would drink it like a wine connoisseur ... rolling it around my mouth and over my tongue before swallowing it. OK, maybe I was a strange child ..but then again, look at me now. Are you REALLY surprised?
Once again, I have gotten off topic (but it was a nice stroll down memory lane) back to tomatoes. So though I hated tomatoes I loved catsup and tomato soup (with grilled cheese of course) and of course spaghetti. But as I have gotten older I have continued to add more and more tomatoes to my diet. But I have always been resistant to any raw tomato. Several years ago I decided that a small amount of tomato on Mexican food was really good. I love salsa but I stuck to the more thinner kind with less chunks in it. Then I tried Sams club "Fresh Salsa" sold in the refrigerator section and I was like ..HEY that's pretty good stuff. Then I decided to try to make my own Pico de Gallo. That was it, I was hooked!!! I was beginning to realize that I could no longer claim to hate tomatoes when I started eating the Pico De Gallo by its self. With a spoon! But, when I was cutting up tomatoes for it the other day and the juice ran down my wrist and I licked it a thought MMMM...I knew I was busted! Now you will still not catch me putting a slice of tomato on a burger and you will NEVER catch me putting them in my salad (thanks to MOM for traumatizing me ...lol). I love tomatoes in lots of other things!

I am sure you are saying ..."geeze is she EVER going to get to the point? ...you know ... like an actual recipe?????" Hey it's my blog! You're not the boss of me! Anyway, I made some Pico the other day and I was planning on adding shrimp and taking it to work for lunch. But through the course of the day I would walk by the fridge and take a spoonful (or 4) of it. By the time I got ready to pack my lunch for the next day. There was a pitiful amount of Pico left. Even with a lot of shrimp it was not going to make a very substantial lunch. So I came up with this tasty (and WAY simple) little dish and was very satisfied with my lunch. I have reworked it to make more than a single serving here. You can use a store bought Pico de gallo but really, its quite simple to make and SO worth it. It also allows you to make it as hot or as mild as you like. I would recommend making the Pico a few hours before mixing it with the rest of the ingredients to let the flavors develop and for it to get "juicy." It's fresh and light and very summery!

Pico De Shrimp and Pasta Salad


3 cups fresh Pico De Gallo (click on link for recipe)
8 oz steamed Shrimp cooled
4 oz of Orzo cooked according to Pkg. and cooled
Salt to taste


Fold together first 3 ingredients. Salt to taste. Refrigerate for at least 30 min.

Approximately 4 servings for a main dish (light lunch) or 6-8 as a side dish.

* I used the frozen precooked shrimp thawed and drained before adding to Pico.

Sunday, July 01, 2007

The Roof The Roof is On FIRE!


So I really had hoped to have a beautiful loaf of bread to Post here today. What was I thinking have I not said OVER AND OVER that I am not a baker????? Well I inherited a bread machine from my friend Robin who is moving UP IN THE WORLD therefore downsizing. I thought ...great this is easy ..dump in ingredients, hit start button and about 4 hrs later BREAD! This is surely NOT considered baking. I CAN do this! Well............... NOT SO MUCH!

2 hrs into this smoke was BILLOWING out of the vents of the Machine!!! Apparently the bread rose TOO much and spilled over the sides of the container dripping down onto the heating element causing a LOVELY stench and like I said before COPIOUS amounts of smoke!!! I SWEAR I MEASURED EVERYTHING!!!!!!

In my defense, One of the recipe reviews I read actually said that this rose too much ..it did NOT however say it would likely catch on FIRE!! No, mine did not catch on fire because I unplugged the machine. Let's just say this was QUITE a mess to clean up! There were parts of the big GLOB that were cooked and I did taste it and it was quite good. But there was just no way to salvage it.

I would like to try this again ...perhaps I will try to halve the recipe??? Or perhaps try a different one. But I am a little gunshy. I DO know that I will NOT put the bread in and leave the house. Which is what I had hoped to do ...you know go to work in the morning and come home to freshly baked bread? Perhaps that would NOT be a good idea. ALTHOUGH....you know I do have insurance ...It would be nice to have ALL NEW Stuff!!! Ok, Maybe not.

Saturday, June 02, 2007

Good Friends and FOOD


I had been thinking about throwing a dinner party for a few days. My friend Larry being the catalyst for that (when are you going to cook again) So faced with a day of no real plans I decided that I was just going to be spontaneous and do it. I rang up my friend Evie and asked her what her and John were up to. They had already talked about going downtown to the Blues and Brews Festival by the River. We decided we would do an early dinner and head down there after that. Unfortunately Larry could not make it(I promise to bring you some left overs) and Marlana was out of town. So it was Evie, John , Me and Tanya.

Considering it was already after 12 when we came up with this brilliant plan I was suddenly in a time crunch.


Menu:
Margaritaville Chicken Fajitas
Shrimp and Orzo Salad
Roasted Green beans
Pavlova

Have I ever told you I HATE Wally World?? Well on a Sat at 1230pm in Hope Mills not only do I HATE it but I LOATHE it. I would have much rather just gone to Harris Teeter where I LOVE, LOVE, LOVE, to shop. Where every thing is clean and neat and beautiful. Unfortunately the prices there are not always so beautiful (although for produce it is totally worth it).

By the time I got home it was nearly 230 and I still had to make the marinade for the chicken. YIKES ! I got that going right away and popped the chicken breasts in so they could do their thing. I also did a separate bag of the veggies with a little marinade also.

Next on the agenda was the Shrimp and Orzo Salad. I had seen this recipe on Barefoot Contessa yesterday and could not wait to try it! That was painless but geeze look at the time it is almost 4 and I still have cleaning to do and oh Gee I forgot the Whipped topping ...and to put out the eggs to come to room temp and ....oh man NO WAY am I going to get everything done

REVISED Menu
Margaritaville Chicken Fajitias
Shrimp and Orzo Salad
Roasted Green Beans
Grilled Pineapple and Berries
over
Strawberry and Mango Sorbet

I have really been wanting to dazzle my friends with the Pavlova but there was just not enough time....sigh!

So at this point it is beginning to drizzle and I am not really thinking I want to wrestle with the veggies on the grill anyway. SO I get this BRILLIANT idea to use my cast iron griddle on the cook top. I do the pineapple first which goes realatively well. Then I move on to the peppers and onions for the Fajitas. About 5 mins into this the smoke detector goes off...not a big deal and CERTAINATELY not unusual. Someone thought it was a good idea to put a smoke detector in my Kitchen. Just using the broiler sets the damn thing off EVERY time. I was not any where near being done with the veggies though and fanning with a towel and turning on the ceiling fan and opening the door was not working. But OMG >>> LOOK at the time. I can't stop. I call my Son in and scream over the piercing beeps ...TAKE OUT THE BATTERIES!!!!! Well, we never did figure out how to even get it open. By the time I was finished cooking the veggies the smoke detectors in the BEDROOMS were going off. Ummm maybe next time I will do those veggies on the Grill after all and the chicken? Oh yeah, I stood in the rain and grilled them.

I can always count on my friends to be late which is good ..because dinner was NOT ready at the scheduled 5:30. But by 6 Evie and John came rolling in (Tanya was on time so I sent her back out to get ice ) and dinner was just about ready to be put on the table!

Everything was yummy and I was especially happy with the Shrimp and Orzo Salad Although I just realized I forgot the parsley. I am Definately making that again. Next time I plan on adding Sundried tomaotes and maybe some red and green peppers just to give it a little more crunch and some color. The only deviations I made from the orginal recipe is I used the Sun-dried and Tomato and basil feta(would you expect anything different from me?) and dried dill ( about 2TBS) because I did not have fresh.

Shrimp and Orzo Salad
Kosher salt
Good olive oil
3/4 pound orzo pasta
1/2 cup lemon juice (3 lemons)
Freshly ground black pepper
2 pounds (16 to 18 count) shrimp, peeled and deveined
1 cup minced scallions, white and green parts
1 cup chopped fresh dill
1 cup chopped fresh flat-leaf parsley
1 hothouse cucumber, unpeeled, diced
1/2 cup small-diced red onion
3/4 pound good feta cheese

Preheat the oven to 400 degrees F.
Fill a large pot with water, add 1 tablespoon of salt and a splash of oil, and bring the water to a boil. Add the orzo and simmer for 9 to 11 minutes, stirring occasionally, until it's cooked al dente. Drain and pour into a large bowl. Whisk together the lemon juice, 1/2 cup olive oil, 2 teaspoons salt and 1 teaspoon of pepper. Pour over the hot pasta and stir well.
Meanwhile, place the shrimp on a sheet pan, drizzle with olive oil, and sprinkle with salt and pepper. Toss to combine and spread out in a single layer. Roast for 5 to 6 minutes, until the shrimp are cooked through. Don't overcook!
Add the shrimp to the orzo and then add the scallions, dill, parsley, cucumber, onion, 2 teaspoons salt, and 1 teaspoon pepper. Toss well. Add the feta and stir carefully. Set aside at room temperature for 1 hour to allow the flavors to blend, or refrigerate overnight. If refrigerated, taste again for seasonings and bring back to room temperature before serving.
Margarita Chicken Marinade
("Perfect Party Food" cookbook)
1/4cup olive oil
1/2 cup OJ
1/4 cup lime juice
1/4 cup gold tequila
1/2tsp ground cumin
1canned chipotle chile in adobo sauce
1/4 cup fresh cilantro
Place all ingredients in blender and blend until smooth. Place chicken and marinade in ziplock bag and let marinate in Fridge for at least 4 hrs or overnight. Makes enough marinade for about 12 chicken breasts. Broil or grill chicken until juices run clear Garnish with fresh cilantro and slices of lemon, lime and orange.

Tuesday, May 29, 2007

A Caterer is Born


After almost a year of anticpation I finally had my first real Catering Gig! I have been working with "the Chef" for a few months but this is my first big event on my own.(100-125 guests) I have done smaller stuff like my daughters party and I helped with a Church members reception last year but this was all me start to finish. I was not really sure if I could pull it off but I DID!!!
About 40 hours of work, 4 burns ,1 cut and only a couple of serious moments of panic went into the day.I had been doing it in my head and on paper for about the past month.

Menu-
Sweet chili chicken bites
Moo Shu Pork cups
Stuffed Mushrooms
Cheese ball /crackers
Stuffed Cucumbers
Veggie Tray
Fruit topiary and Tray
Cheese tray
Meatballs (provided by Kristie)
Chicken Salad/ Crossiants
On Wed morning when I got off work I did my first shopping trip at Sam's Club for the major part of the food. I purchased the meat and most of the Veggies leaving the fruits for the day before the wedding so that they would look their best.

Wed. evening I went to Walmart to pick up the things they did not have at Sam's. All in all I made 5 trips to grocery stores. A couple more than I had wanted to but it could have been worse.

Thu was roasting and pulling the chicken for Chicken Salad, cutting and wrapping chicken in bacon for the Sweet Chilli Chicken bites and cutting the pork for the Moo Shu Pork. I also made the dip and cheese balls.

Fri was the big cooking day! I premade all of the dishes so that on Sat it was just assembly and final cooking/heating. I also made the final shopping trip(s) for the fruit and other last minute items. Fri night I went to the Venue and sat up and decorated the buffet table. Fri was a VERY long day!!! This was good because I was so exhausted that I actually slept pretty good Fri night which I had worried that I would not be able to.

Sat morning I loaded everything up and got to the Venue around 830am. My friend Robin AKA Did you wash your hands came around 915 to help me with final prep and serving. When she showed up I was in kind of an overwhelmed don't know where to start state. But she jumped right in and before I knew it we had a rhythm going and were knocking it all out. There was a brief moment of panic around 12 when I did not think that we would get it all done but we kicked it into high gear and had everything on the buffet by 1:00. It turned out that the guests did not even start coming until almost 2 so we were on easy street!
Robin working her Magic!
We did a lot of hustling during the reception. I don't have all of the equipment (like replacement pans for chafing dishes ... not to mention the chafing dishes were borrowed too) so restock had to be done on the buffet line. I had placed the 4 chafing dishes on the ends of the table which was a good move (though not intentional) so we were able to get to them without too much trouble.

Problems we had were surprisingly few. We did run out of Mushrooms and chicken salad but there was plenty of other food to make up for that. The bride did provide meatballs which is probably a good thing. I think we might have run out of more things had she not. All of those things were lessons learned that I will take to my next event and none were even close to being catastrophic.

There are several people I need to thank for helping to contribute to the success of this event. First Robert and Kristie for trusting me and giving me the opportunity to do it. To Cheryl, Lisa and Keith for loaning me equipment that I could not have afforded to buy (and kept me from having to rent it) I also want to thank Keith for allowing me to work with him and teaching me so much. Without my time with him this would not have been anything close to what it was. (Sorry, Yes I did steal your Moo shu idea ..but not your recipe) To all my friends and family who had to listen to my constant obsession about it. Most of all I want to thank Robin. Her help and skills and talent were priceless to the final product!