I have come across a new cooking challenge. My friend Evie, has recently been diagnosed with Celiac disease. For those of you not familar, people with Celiac cannot eat gluten. Gluten is found in... OHH, just about EVERYTHING! I am exaggerating of course but when you add on allergies to Eggs, Dairy and Soy to that (which many of those to include my friend, with Celiac are also allergic to) it really becomes quite exasperating.
I found this diagnosis appalling. I considered how devastated I would be if I received such a diagnosis. What it would mean to me, as a person whose very being revolves around food and cooking. Though this reaction definitely conveyed my deep felt empathy to my friend it was not one that was constructive or supportive and I was ashamed of myself. So, I set out to educate myself and to learn to feed my friend.
The information that I have taken in over the past couple of weeks has been immense and overwhelming. I have many times gotten excited about a recipe only to be shot down by a realization that a single over looked ingredient had an offending agent in it. Oh and don't forget "cross contamination"

This weekend we were celebrating her "White Coat" Ceremony from PA school. This is the point of PA school where you have finished the class room education, begin your real world education and actually begin treating Patients (under supervision). A pretty big deal and I was EXTREMELY happy for her. Of course celebration to me ... means food!

I spent the week planning a menu that was about 90% gluten, egg, soy, dairy free. I wish I could say it ALL was a great success.
The good news, People with Celiac can eat all Meat, fruit. veggies and rice. So that was not a problem.
I marinated both Chicken breasts and Skirt steak (separately of course) in a marinade that I have posted here in the past. It's a tasty marinade and though I didn't manage to get a picture of it. I will post the recipe for you again.
Margarita Chicken Marinade
("Perfect Party Food" cookbook)
1/4 cup olive oil
1/2 cup OJ
1/4 cup lime juice
1/4 cup gold tequila
1/2tsp ground cumin
1canned chipotle chile in adobo sauce
1/4 cup fresh cilantro
Place all ingredients in blender and blend until smooth. Place chicken and marinade in ziplock bag and let marinate in Fridge for at least 4 hr. or overnight. Makes enough marinade for about 12 chicken breasts. Broil or grill chicken until juices run clear Garnish with fresh cilantro and slices of lemon, lime and orange.
My peach-mango Hemp milk "Ice cream" on the other hand ...ummm NOT such a success. It would not get thick even after spending a couple hours in the freezer. At best, it was sort of Peach smothie. Today when I took it out of the freezer it had finally froze ... SOLID! LIKE A BRICK! The flavor on the other hand wasn't all bad. My friend said it tasted sort of like peach cobbler. This one is going to take a little more experimentation.
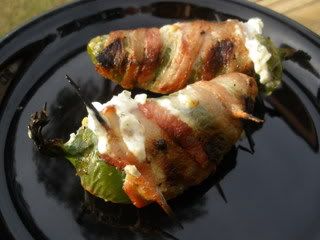
As far as the remaining 10 percent of the menu ... well that went a little better. I have decided that pretty much ANYTHING wrapped in bacon will be loved. Honestly, I think that I could wrap cardboard in bacon and everyone (especially men) would gobble it down and beg me for the recipe. Evie's fiance John and my friend Ross were terribly disappointed when I told them we would NOT be having Sweet Chili Chicken Bites. but that disappointment was short lived when I served This....

I saw a version of this originally on Food Network. I think Bobby Flay did it but I could not find that recipe so I searched Recipezarr and found this one. I made some very minor adjustments in the preparation but not the ingredients. Prepping the peppers (try saying that 5 times fast) is a little tricky and time consuming but TOTALLY worth it. I would advise using gloves and for heavens sake DON'T touch your eyes or nose while prepping them.
Bacon Wrapped Stuffed Jalapenos
16 ounces cream cheese, room temp.
4 large garlic cloves, minced
1/4 cup finely chopped sun-dried tomato
2 tablespoons finely chopped fresh cilantro
1/2 teaspoon coarse sea salt (to taste)
1 LB bacon
20 large jalapeno peppers (as large as possible)
About 40 toothpicks, soaked for about 15 minutes in water
Mix cream cheese, garlic, tomatoes, cilantro and salt together and place in a large ziplock bag with one corner snipped off (or in a pastry bag).
Make a T shaped incision in pepper severing the core at the top but not cutting off the stem. DO NOT cut pepper all the way through. With a small sharp knife (I actually used a grapefruit spoon which worked pretty well) scrape out seeds and membranes. The cleaner you make the inside of the peppers the more mild it will be. If you like a little heat then leave a bit of the membrane and seeds. If you like them FIREY the you could just loosen the membrane to allow room for the. filling (Removing/leaving some of the membranes and seeds gave them a nice little kick).
Pipe cream cheese mixture into each pepper. As tempting as it is DO NOT over fill You want the pepper to close up nicely without the cheese oozing out.
Starting at the top of the pepper wrap the bacon around it securing with a couple of tooth picks. Cover as much of the pepper as possible and sort of stretch the bacon to make it snug (room temperature bacon is easier to work with).
Place peppers on a hot grill for 10-15 min turning frequently until bacon begins to crisp and pepper is a bit charred.
Remove from grill and let cool for 5-10 min. These can also be served room temperature and the original recipe says they are good cold (no way that they would last that long with my friends)
Note: less expensive bacon works better than premium or center cut. Think thin and pliable.
These also could be placed in the oven at 450 degrees for about 10 min but I think the smokiness of the grill definitely adds to the flavor.


