Wednesday, August 19, 2009

Long Overdue


I know that a new post is way way overdue. It has been a busy summer in my household! Though it is not quite over yet I thought I should at least "throw you a crumb" and let you know I am still around. I promise to give you a more complete explanation of my absence and resume more regular posting soon!

This is one of those "Hmm?" recipes. I really was not sure that I was going to like it when I saw it but it made me curious enough to give it a try. The great thing is you can make just a little bit and try it out before committing to it. It might not suit all tastes but I would encourage you to be adventurous and give it a go! The measurements are a guideline and not really specific. I am not usually a "less it more" kind of girl but in this recipe that is the approach you should take. It's about complimenting and making the flavor POP!

This makes a beautiful salad for a starter or even a very light dessert. I just love to eat it for a snack!

Watermelon-Feta Salad


4 cups cubed watermelon


4 oz crumbled Feta cheese


2tbs Balsamic vinegar


1 tsp Olive oil


4 Tbs fresh shredded basil


Place 1 cup watermelon each, in individual serving bowls. Whisk together Balsamic vinegar and olive oil. With a teaspoon, drizzle over top of watermelon. Distribute feta evenly between bowls and top with Basil. You can also replace half (or all ) of the basil with fresh mint for an extra zing!


Thursday, June 04, 2009

Worth Repeating


In 8 days our house will be a wall to wall family ready to begin a 4 day celebration of the graduation of my Daughter and my Nephew. Because my Daughter attends one of the largest High Schools in Cumberland County graduating a whopping 458 seniors we get to be the last graduation of the day starting at 8PM. Considering that we are not likely to leave the Crown parking lot before 10pm that makes it a little late to do much "partying". Fri morning we are packing up the Family and heading to the beach. In a moment of craziness I decided that an open house before graduation would be a good thing to do. What the heck was I thinking???? Oh yeah, did I mention that of the 8 days between now and graduation I am working 4(12 hours each) of those days.
But done is done and now I must plan what we are serving. I am just getting started on the menu but this is the one thing I have decided to make. If you have been reading MMM MMM Good a while you may have seen this recipe before but it is always a big hit. I have made it for picnics and even a couple of weddings. One of my favorite things about it is that it makes a beautiful , impressive presentation. So here is an encore presentation of Muffaletta.

Sandwich Artistry


I saw this on an episode of Everyday Italian months ago and thought it looked amazing! I had been looking for an opportunity ever since to make it. I finally did on the 4th of July. It was a HUGE hit and I have made it twice since then. One time was for friends who came over to discuss a menu for their Wedding reception. (Yes, I will be make that for their wedding). I also made it last week and took it along to Fayetteville after 5 for my friends and I to munch on while listening to the beach music. Again it was a hit. You can absolutely use whatever cold cuts and cheeses in it you desire. I used spinach in it because I thought it would hold up better than other lettuces. You could also try arugala if you don't like spinach but I just didn't mention it to anyone (my kids) who does not like spinach and they did not even notice.Though I am not crazy about olives the flavor of them in this is irreplaceable. My personal twist on this was the pesto which I think adds a great flavor to it. I think next time I might even layer some basil in with the spinach ...mmmmmm basil! The bread is also something that can be whatever you like. Round and crusty are pretty much the requirements for that. The secret to this recipe is that it MUST be made 8-24 hrs ahead, wrapped tightly and refrigerated. This lets all those yummy flavors soak into the bread.


Muffaletta

1lb round loaf of Sourdough bread
1/3 cup of Olive tampenade
1/3cup pesto
Spinach leaves
4oz sliced swiss chese
4oz sliced provolone cheese
4oz pastrami
4oz ham
4oz turkey breast
Thinly sliced Red onions
Thinly slice roasted red peppers

Carefully cut off about 1/2 in off top of Bread. This will become the "lid." With you fingers hollow out the bread leaving about a 1/2 inch wall on bottom and sides. Mix together Tampenade and Pesto. Spread 2/3 of mixture over bottom , sides and "lid" of bread. Place a single a layer of meat, cheese, tampenade/pesto, peppers, onions and spinach. Continue to layer ingredients alternating types of cheese. Continually press down on ingredients packing them very tightly into bread. Replace Top of bread onto loaf. Wrap sandwich as tight as possible with plastic wrap (press and seal is great for this). Refrigerate sandwich for at least 8hrs. Cut sandwich into 8 wedges immediately before serving.

Note:The tighter you pack the ingredients into the bread the better this will stay together when you cut it.

Tuesday, May 26, 2009


Today I am going to take the opportunity to answer a some of the questions that I frequently get asked as a Paramedic. I know that doesn't really seem to have anything to do with cooking but stick with me, in case you haven't noticed I can relate ANYTHING to cooking and/or food.

Do you drive the ambulance?

Yes I do. If I am riding with another Paramedic then we alternate driving and taking care of the Patient. If I am riding with a Basic or Intermediate EMT it depends on what is wrong with the Patient.

What is the difference between a Paramedic and an EMT?

Technically we are all EMT's. There are 3 levels. A basic EMT (or EMT-B) They can do CPR, breathe for you if you have stopped,stop bleeding, help you if you are choking,secure your C-spine (to prevent further injury), splint broken bones,give Oxygen, use an Automatic External Defibrillator(AED) and basically help out the Paramedic. It is often said," Paramedic save lives and Basics save Paramedics." This is often true but even more important is that those basic skills are very important, immediate life sustaining things that must be done for a Patient and without those, all other treatment by a paramedic or even a doctor is not going to be of help.

Intermediate EMT's (EMT-I) can do all of the things that a EMT-B can do and they can also start IV's, Intubate (place a tube in your airway to more effectively breathe for you) and give certain medications.

A Paramedic does all of the things a EMT-B and EMT-I can do and they can use a Manual defibrillator (and treat several different cardiac rhythms not just a cardiac arrest), Give a wide variety of medications and do a few other advanced procedures such as a tracheostomy. Though the EMT-B's and EMT-I's can do a lot of skills before a Paramedic gets there. Once we are on scene though, they can/do all the same things buy we are ultimately responsible for the care of the Patient and make the decisions.

Why does the Fire Dept come when I call for an ambulance?

There are a few reasons for this. Usually the Fire Departments can be there faster than an ambulance because the are located IN the community. There are considerably less ambulances than Fire stations. Often the nearest ambulance may be coming from the hospital or even the other side of the county. At least one if not several of the Fireman that respond to a call will be a EMT-B and like I said before can perform basic life-saving skills. They also respond to Motor vehicle crashes (MVC) in case of the need too extricate people (Jaws of life) from the vehicles if needed, control any fluids leaking, put out any potential fires and just generally make it safe for us to do our job around unstable cars and/or other dangerous things. They are also a huge help to us and often help with lifting and sometimes ride in to the hospital with us for an "extra set of hands" when a Patient is very unstable. Obviously they will be there if there is any potential for fire or hazardous chemicals or materials. As paramedic we get just basic knowledge of these things and I promise you I will NOT be running into a burning building. That's why I am a Paramedic and NOT a Fireman!

What is the worst thing you have ever seen?

The worst thing I have ever seen was a pedestrian being struck by a car. When I say I have seen it, I mean I actually saw it happen. I also saw that it was going to happen and was not able to do anything to prevent it. Though the patients injuries were serious I have seen worse. The "worst" part was the trauma of witnessing it. It definitely took me a few seconds to get my bearings and be able to think straight to do the things I needed to. Not to mention that I already had a Patient in my ambulance. Though I began treating the Patient I had to wait for another ambulance to come. That situation gave me a little perspective on how long the wait seems.

Do you use turn on the lights and sirens just to get through intersections? and I also get "I have seen them go through and intersection and then turn them off."

I promise you that if we are using lights and sirens we are going to a call or to the hospital. In fact we often don't use them going to and from a call. The dispatcher codes our calls with the information they are given by the caller and they tell us if we should be driving "emergency traffic." We have many calls that are not " immediately life-threatening" Even calls that are ,once we begin treating the patient we can sometimes relieve the life-threat and take them to the hospital at a safer speed.

Every time we turn on the lights and sirens we are putting not only the general public in danger but ourselves (and the Patient) as well. We all have families of our own and though we do this job because we love helping other people. Our #1 priority is to go home to our loved ones at then end of the day.

You may see an ambulance come screaming down the roadway and then once they pass you, turn off the lights and siren. This can happen for a wide variety of reasons. We may have been cancelled from the call. More information about the nature of the call may have been obtained (by the 911 operator or perhaps the Fire Dept that is already on scene). Sometimes the scene is not safe for us to enter and we must wait for the Police to get there first or another ambulance may have been closer to a call. We also sometimes use lights and sirens for safety as we may need to cross heavy traffic (that often is paying attention to what is going on at the scene) when we are leaving a scene or if we are going in one direction and we get a call that is in the opposite direction and we need to make a U turn or other unexpected lane change or move.

But, my all time favorite question is ... Do you get a lunch break?

NO ,WE DON'T! We grab food whenever we get a chance and often eat it going down the road. If we do make it inside a restaurant and order food we may get a call as we are taking our first bite (or even before we get it) and either we grab it and take it with us (often to be eaten cold hours later) or leave without it. Some days we are lucky and may have an extended time to sit and eat but not often. It is for this reason that you may see us shifting around impatiently while waiting in a line at Mikey D's or gobbling down our food at a pace that is sure to cause indigestion later.

It's for this reason that I usually try to pack at least part of my food or some snacks. A busy 12 hour shift is a long time to go on a quick cup of bad coffee and a package of Nabs. Not to mention a constant diet of fast food reeks havoc on the waistline. If I have a sandwich, some fruits, veggies or left overs. I can grab them (and scarf them down quickly) between calls to try to maintain some semblance of a healthy diet. Though storage and maintaining food at a safe temperature poses a challenge, especially on very hot days.

But the BEST days are when we happen to be at the Fire Department at mealtime and the firemen are kind enough to ask us to join them. Those firemen are my FAVORITE! (Yes, I am sucking up. Stupid I am not. I know some of them read this.) Cumberland county has some great cooks posing as fireman. I have shared "cooking talk" with many and I have given and received advice.

I have eaten many meals prepared by firemen. Being that we are in the South, I find that most firemen make really great traditional southern food. Stick to your ribs, comfort food. I have had fabulous chicken and pastry, meatloaf , fried chicken, chili and Lasangna just to name a few.

But station #7 is the "home" of a rather talented cook/chef. (Now guys ...don't get offended you ALL are great cooks) If you are not familiar with the North side of Fayetteville you may not even notice Fire Station #7 on Stacey Weaver. The station looks very much like many of the houses in the neighborhood. But I am sure if you live close by you have seen the doors open up and the trucks rolling out. I am also guessing once or twice you have been woken up by the sirens. If you happen to go by at dinner time and Firefighter Meece is on shift you are likely to smell something yummy coming from the kitchen.

He and I have talked food many times but a few months ago I got the pleasure of actually sampling some of his handiwork. I walked into the station as the firemen were sitting down to dinner. I was warmly greeted by all and invited to join them. "Oh man I just ate something" was my reply. But then I walked into the kitchen and spotted something that looked WAY to good to pass up. When I tasted it I was SO glad that I didn't. I left the station that day VERY full!

He called it a Chicken Cordon Bleu Sandwich. That is exactly what it is but I think it needs a more fitting name. Hmmmm...

I asked him for a "recipe" for this and he rattled off some ingredients and basic instructions but no real recipe. Now I know how people feel when they ask me about a dish I made. So this is my interpretation of his sandwich I think it's pretty close. The one thing that I think is a MUST for this is really good bread. He used "everything" Ciabatta bread (from Walmart) and I would really recommend that. It has garlic, poppy-seeds, sesame seeds along with some other stuff.

Lucky #7 Chicken Cordon Bleu Sandwich


1 loaf Crusty bread
1lb chicken breast pounded 1/4-1/2 inch
Basic Chicken Breader (I used House of Autry)
1TBS Citrus Grill seasoning
1 tsp paprika (smoked is nice)
Salt and pepper to taste
1 egg lightly beaten
1 Tbs milk
8 oz provolone or Swiss cheese
8 oz sliced deli ham
1/4 cup vegetable oil
1Tbs olive oil


Beat egg lightly with milk in a shallow dish. In another shallow dish, combine chicken breader, citrus seasoning, salt, pepper and paprika. Dip chicken in egg mixture then dredge in breader mixture. Heat oil in large skillet. Fry chicken in oil for aprox 3 mins on each side till chicken is cooked through and it is golden brown. Drain on Paper towel. Slice bread in half. Place bread cut side up a on baking sheet. Place chicken on one half and top with ham and cheese. Lightly brush other half with olive oil. Place under broiler for aprox 2 mins until cheese is melted and bread is lightly browned. Place two halves together and serve immediately. Serves 4-6

Thursday, May 07, 2009

Wait! It's Not What it Looks Like!


I have mentioned before that even though I am divorced, I have a very close relationship with my in-laws. I am not going to say "Ex" in-laws because I did not divorce them.

But I did get off to a rocky start with my Mother-in-law. I am pretty sure that it was a classic case of "you are taking my baby". I am not sure when she let go of that (maybe she didn't ever but at least came to accept it) but over the years our relationship evolved. I may not share a blood bond with her, but we do through my children and I love her just as much as the rest of my family. I think Hopefully, the feeling is mutual.

About a year and a half ago my Son started dating a girl that I happen to like very much. Besides just being a nice person she seems to make my Son very happy! He says and does things that I would never have imagined from him. I am sure a lot of it has to do with maturity on his part but I am giving her some of the credit for some of it too. I am not pushing (I promise Ryan I am not), but if at some point they decide to get married I don't think that we will have that awkward Mother verses Daughter-in -law thing.

Cooking for people I like is definitely my favorite thing to do. That being said I am going to admit that this cake (the actual cake part) came from a mix so no recipe today. But the "sushi" was made of made of rice krispy treats, gummi bears, gumpaste,and non-pareils, I came up with the idea a few months ago when we went out for sushi and the waitress said to my Son and Laura ..."you here again?" I spent a good part of Fri and Sat night working on the "sushi" I looked at lot's of pictures online and even bought some real sushi to help me get this just right. I hope she likes it!

Happy Birthday Laura!

Sunday, April 05, 2009

Geography, History and a Recipe


According to Southern rules I am a Yankee in that I am from "above the Mason-Dixon line." But really I consider myself from the Midwest. You can argue this point all you want but I have done my research! The Mason-Dixon line does NOT extend west of PA. That being said, I am not sure why it is called Mid WEST because more than half of the Midwest states fall in the Eastern half of the United States. But I digress...badly!

Long before the word "slider" became so mainstream...There was White Castle. The king of all Midwest (though you can get them in NY and New Jersey along with a few NON Midwest states), late night, especially after drinking, regret it in the morning foods. When we travel "back home" to Indy that is usually one of the first places we go. Sometimes we even pick them up on the way into town. Even if we are just there for a few days we often have them several times. Let me tell you we LOVE our White Castle!

Now I know that you can buy them frozen in the grocery store and I do give in to the craving occasionally and buy them. They are not bad ... but not the same. One thing they don't have is dill pickle slices, which in my opinion is essential. My Son, however (Mr. Eats nothing Green) will argue that point.

Years ago I made a "White Castle" Sloppy Joe using Cream of Onion soup but I cannot seem to find that anymore. I did a little research and found this recipe on Recipezaar. Yes, I know this is far from Gourmet cooking but its quick, easy and actually quite tasty. Its not the real thing but it sort satisfies my craving.


"White Castle" Sloppy Joes
  • 1 1/2 lbs ground beef
  • 1 cup finely chopped onion
  • 2 Tbs flour
  • 1 Package dried onion soup mix
  • 1 cup hot water
Brown ground beef with onions. Drain fat. Stir in flour. Dissolve soup mix in hot water and add to meat. Simmer for 10 mins.

Place meat mixture on bun and top with cheese and dill pickles if desired.


Wednesday, April 01, 2009

A Bubbly Little Dessert


Late last summer I finally broke down and bought myself an ice cream maker. I had been wanting it all summer.Every time I would see a recipe for yummy sounding ice cream I would say " I am going to buy one" So, in August I did it!
The first time I used it I quickly learned that "ready in 20 mins" is a LIE! First of all the "bowl" must be frozen. This is best done OVERNIGHT! The ingredients for the ice cream ususally have to be heated and then COOLED. This is best done.....OVERNIGHT! Now, once you add the cold ingredients to the frozen bowl. It does only take 20 mins to "make" but then you need to let the finished product "firm up" in the freezer , for about 2 hours!
How many times have I made ice cream since that first attempt. UHH, that would be a big ZERO. I thought about it many times but always at the last minute and as you can see from the above paragraph, that does not work. I finallydecided to store the bowl in the freezer so at least that part would be ready for the next time I decided thought about making ice cream. That was sometime in October I think.

Last week I invited my friend Marlana over for dinner. I decided the night before that I was going to make this Champagne Sorbet. BUT, I did not make it out to get the champagne..or the grapefruit that night. By the time I got home from church and shopping for the ingredients for dinner....it was too late, AGAIN.

But I had the ingredients and now its been almost a week with 4 grapefruits sitting in a basket on my table. Now I do like grapefruit.But ,not enough that I am going to eat all 4 before they go bad. So, today for no special occasion at all we are having Champagne Sorbet.
Despite the time involved in all the steps, it is quite easy to make. I used sparkling wine instead of champagne. The directions I got from Simply Recipes stated you could make that substitution. I think that next time though I am gonna try with the Champagne. The finished product though very good but a bit sweeter than I expected.

One thing that I was hoping for was a sort of "sparkle" but in order to get the alcohol to freeze it has to be boiled. Which not only burns off the alcohol but removes the "fizz". The recipe suggests drizzling a teaspoon of the Champagne over top of the sorbet when serving to give a little of that back. I did that and liked it very much. In fact I liked it so much that the next time I added a little lot more than a teaspoon and it was like a grown up Champagne Float ...mmmm quite tasty!

Someone also suggested placing the finished Sorbet in a bowl without a lid then placing that in a cooler with dry ice for a few hours. According them the CO2 the dry ice gives off will "infuse" the sorbet. I am definately going to try that! I will let you know how it works out.


Champagne Sorbet (from Simply Recipes)
1 1/2 cups Champagne Sorbet
1 cup Sugar
1Tbs Light Corn Syrup
1 tsp lemon and/or grapefruit zest
1 1/2 cups fresh squeezed pink grapefruit juice
1/4 cup fresh squeezed Lemon juice
Pour champagne, sugar, corn syrup, and zest into a saucepan. Bring to a vigorous boil so that the sugar completely dissolves, remove from heat.
Strain into a stainless steel bowl (will help cool down faster), add the grapefruit juice and lemon juice. Chill completely.
Process the mixture in your ice cream maker according to the ice cream maker directions. Transfer mixture to a storage container and freezer in your freezer until firm.
Makes about 1 quart.

Monday, March 23, 2009

The Most Beautiful Salad In History


Ok, perhaps an overstatement. No ...second thought, it's not. At least not from my perspective. But its not just beautiful, NO SIR-ee it is delicious to boot! According to Ree from "The Pioneer Woman Cooks " (which is where I found this recipe) it is SUBLIME! Do, I agree? Would I go as far as to call it sublime? That would be a resounding HECK YEAH!
I am sure that it does not hurt that this is the first "spring is here, summer is on it's way" dish I have made this year. Chock full of beautiful produce in all the colors of the rainbow. Oh how I LOVE summer! But what makes this salad is the Dressing. The Pioneer Woman has found the perfect ..."did you hear me?" I said PERFECT balance in this recipe. You can change any of the vegetables you like in this dish but don' t DARE change the dressing. I promise you, you won't be sorry. If you have read this blog more than a few times you will know that is a pretty strong statement coming from me. I am usually all about making a recipe your own. BUT DON'T!
You can use any veggies you like in any amounts. I will tell you I used A BUNCH! I also only used a half a pound of dried linguine where the recipe called for a whole pound. Let me tell you this makes a ton! I would not have had a bowl big enough to fit a whole lb. The mixture of veggies I used incorporates all the beautiful colors of nature. If you don't like something leave it out or substitute it for something else but be mindful of the colors. Remember, you taste with your eyes first.

Asian Noodle Salad


adapted from "The Pioneer Woman Cooks"


Salad
1 bunch-Boc choy
1 small head Nappa Cabbage
1 Small head Purple cabbage
1 each-Red,yellow, orange pepper
4 Green onions
1 bag Baby spinach (washed and dried)
Small container of bean sprouts (mung beans)
1/2-1 lb linguine noodles
3/4 of a of Bunch cilantro , roughly chopped (about 1/4 will go in dressing)


Dressing
Juice of 1 lime
1/2 cup olive oil
2 TBS Sesame Oil
1/3 cup Soy sauce
1/2 cup brown sugar
3 TBS fresh ginger, minced
2 cloves garlic, minced
1-2 hot peppers, finely chopped (serrano or jalepeno)
Cilantro
Cashews (optional)


Cook Linguine according to package directions. Drain, rinse in cool water and drain again.
Whisk together ingredients for dressing and set aside.


Thinly slice cabbages and place in to VERY large bowl. Julienne peppers, thinly slice white and green part of scallions and add to cabbage, Add remaining salad ingredients and linguine.
Pour dressing over salad and toss well. Top with cashews if desired.


Notes: As this salad sits the veggies begin to wilt and lose a little of their wonderful crunch. It is still very good this way but not nearly as pretty. If you are making this ahead don't toss everything together until you are ready to serve. Mix together veggies and place in large ziplock bag. Mix a few tablespoons of dressing with linguine (this will keep it from sticking together) and store in another ziplock bag. Immediately before serving toss veggies, linguine and dressing together.

Wednesday, March 11, 2009

Poke Me With a Fork, I'm Done


It’s official, I am old! My "baby" turned 18 on Sunday. I have found that my birthdays don’t make me feel this way near as much as my children’s do. Face it, we can exercise and use face creams and lie about our age as much as we like. Sometimes we can even get away with it. But we can’t stop our children from growing up.

I don’t typically lie about my age (when asked) but I do like to feel like people think I am younger than I am. But, when someone meets my children or I talk about them or show pictures and I get a "I didn’t know you had children that old." or "You don’t look old enough to have children that age." The image is shattered. The "you don’t look old enough" comment at first feels like a compliment but then there is that unspoken "WOW, you are REALLY old!"

I never thought I would be that woman who wishes she was younger. That’s easy to think when you are 18 or 20 or even 25. Not so much at 42 because 45 is just around the corner and then 50 OMG!!!!

Do I wish I were 18 again? No way! I don’t even wish I were 25. I think I would like to stay about 35. I feel like I really didn’t know "who I was" until I was about 30. Which is why I don’t think anyone should get married, get a tattoo or have a baby until they are at least 30. Did you hear that Kristen???? How about you Ryan?

So, how old am I ? "I am 35!!" what is that you say? "Yes, I did have my first baby at 14!" Dang, that does not support my argument to my children to wait until they are 30 ...does it? Sigh ..ok how about 35 with experience?

On to some food!

I spent the better part of Saturday afternoon looking for a "different" cake to make for my daughter for her birthday. I was flexible. I wanted either something REALLY pretty or something REALLY cute along with tasting good OR something really really decadent. Remember however, that I am not an accomplished baker. I would have loved to make that coconut cake I made last year but Kristen does not like coconut. I also could not make anything with pineapple because Ryan does not like that.

Due to those criteria and a quickly running out of time (for anything complicated) I resorted back to my "go to" birthday cake. I make this all of the time because it’s really easy and personally I think it looks "special". Normally I use multi-colored sprinkles to decorate this cake because it gives it a very festive "birthday" look but I still was striving for that "really pretty" thing.

Did you know that several flowers are edible? Nasturtiums are one that I know off the top of my head along with Pansies. I have long wanted to try them.( I think they would be beautiful in a salad). But, I never felt like I had the right crowd to be receptive to this. I didn’t think my children would eat them but I figured what the heck. No one actually has to eat the flowers, they can push them to the side and they will make this cake beautiful!

I found them at Harris Teeter in the herb section. They are organic and perfectly edible. I did try them and actually found them to be flavorless. This collection was all pansies. Perhaps Nasturtiums might have more flavor. I do plan on using them in a salad at my first spring/summer dinner party!

This Jell-o "Poke Cake" is wonderfully moist and not overly sweet. It’s a little tricky to make as a layer cake so if you are not going for "really"pretty feel free to make it in a 9x13 pan. It definitely falls in to the BBFYB (Big Bang For Your Buck) category!


Jell-o Poke Cake


1-3oz pkg Jell-o


1 packaged white or yellow cake mix


1 -16oz container Cool Whip(thawed)


Eggs, oil, water, butter or whatever you cake mix calls for


Decorations of your choice


Prepare cake according to package directions in 2- round layer pans. Remove from oven and let cool for at least 10 minutes (after removing from pans)

Prepare jell-o according to package directions. Cool slightly but DO NOT chill.

Place one layer on cake plate (or what ever you plan to serve it on) bottom side up. Place wax paper on another plate and place other layer bottom side down on plate. Using a fork poke holes all over cake (you can’t make too many).

Pour or spoon half of jell-o slowly and carefully over one cake and half on other. Chill for 20 minutes.

"Ice first layer (the one on cake plate) make sure the top is covered but do not make it too thick or the second layer will slide around.

Carefully remove second layer from wax paper a place bottom side down onto first layer. Ice entire cake with Cool Whip being careful not to press too hard on cake or you will get cake bits in your "icing"

Once cake is well covered make peaks in your icing by gently placing knife or spatula into icing and lifting straight up. Top cake with flowers, sprinkles or other decorations of your choice. If you would like to write on cake the gel type of decorating icing (in small tube) works the best.

Chill for 1 hour before serving.

Notes: You can use whatever flavor/color jell-o you like. My favorite is strawberry-banana (and often decorate it with sliced strawberries). My favorite cake mix to use is the Duncan Hines "butter recipe" YUMMY!


Saturday, February 21, 2009

New Territory


My son never ceases to amaze me! A child whom I once thought might be the pickiest person on the planet has once again presented me with a challenge. For our family dinner a couple of weeks ago (I know it's been a long time since I have posted) he asked me to make Korean Food.

REALLY? Korean? You mean a cuisine that is full of VEGETABLES??Things that are green?

Honestly I have not even eaten, let alone cooked much Korean food. In fact the only thing I can think of off the top of my head is Bulgogi. So, I am being challenged to make food that I have no idea WHAT it is supposed to taste like. So I am making no claims of the authenticity or correctness of this food. I did buy most of the ingredients in an Asian market if that counts for anything. I also found Home Cooking Diary a blog written by a young Korean guy that has great (what appears to me to be) basic Korean dishes. I looked at several other sites and compared ingredients and methods and they were all pretty similar but I there was just something I liked about his. So I pulled some ingredients from other recipes I found but I really used his site as my guide. I am sad to say though it looks as though he has stopped posting (nothing new since October) but what he has gives me a good base of Korean Dishes.

Have you ever been in an Asian market? I find them a bit intimidating. Maybe it's just having no idea what the vast majority of the products are . A situation that I am not used too since I pride myself in having a pretty good base of knowledge when it comes to food and cooking.

Maybe it's the pungent smells that though I know will produce the tastiest of dishes, are a bit overwhelming all together and in such large quantities.

Then there are the employees. They scare me. They make me feel like I don't belong there. When I ask questions the barriers of language and accent make it difficult to know for sure if they understand what I am asking and more importantly do I understand what they are telling me. Before anyone gets offended or thinks I am stereo-typing let me stop and add something here. I realize that this is my own perception and insecurity. It has much to do with a lack of understanding of their culture.

I am aware of this because in high school my best friend was Chineese and Philipino. The first time I went to her home I was petrified. To me every conversation (they spoke mostly Chinese) that went on between her family members sounded like they were fighting. After a few times of visiting and me asking her if her Mom hated me or was she in trouble for something I realized that their tone was just different. Even after I understood that her family liked me and her Mom would cook things just for me because I liked them it still was hard to believe they were not mad or when they were talking.

So, anyway back to the food. I made a feast of Korean food. A weeknight family dinner turned into a impromptu dinner party when I realized I was going to have a TON of food and I asked my daughter to invite a couple of friends. Everyone liked something and somethings were not liked by all.

Probably my daughter liked the least of it because a lot was spicy. But I made some bulgogi just for her. My Son was very pleased and tried everything and even liked some things that were green. One of my daughters friends has a Korean girlfriend and gave me a thumbs up on authenticity. Maybe he was just being polite but I will take it!

The title picture today is the basic spices and condiments that seem to be essential in Korean cooking.The red pepper paste being the #1 thing that was in almost all of the dishes. This was a bit of a pricey adventure because I did not have the majority of ingredients required. But now I do and next time it will be much more affordable.

I am going to leave you with just one simple recipe today and save more for the next post (and I will try to make that VERY soon). This was the sleeper that I did not expect to be so good. This is a banchan which in Korean is a side dish. You serve it as a community bowl and each person takes some and puts it over steamed rice. Though I think its great eaten by itself and love to just snack on it.

I actually bought it premade the day before I made this dinner and it was so good that I ate most of it that night. I had planned to go back and buy more for the dinner but then I found the recipe and it was so easy that I couldn't justify not making it myself.


Spicy Dried Squid

1 1/2 Tbs Red Pepper Paste

1Tbs Corn syrup

1/2 tsp finely minced or grated garlic

1Tbs sesame oil

1 cup packed frozen dried squid (see note)

1 Tbs sesame seeds

Mix first 4 ingredients together in a small bowl set aside. Rinse and drain squid. Heat 1 tsp oil in a large frying pan. Add Squid and stir-fry for 2 mins. Mix in sauce and stir fry 1 minute longer. Remove from heat and sprinkle with sesame seeds. Serve over steamed white rice.

Notes: You can also use shelf stable dried squid.

TEASER!!! Tune in next time for this

Friday, January 30, 2009

A Ray Of Sunshine On A Cloudy Trip


Though I have mentioned all the BAD parts of my trip up north, I have not told you about any of the good parts. Yes, honestly there were some good parts. I got to see all of my immediate family along with some of my extended family including my cousin whom I have not seen in about 10 years! Considering I was in Indiana for less than 48 hours that is quite an accomplishment!
As I mentioned before, I went to Dayton, Ohio to see one of my best friends (who I have not seen for 2 yrs) on my way to Indy. Now I have LOTS of "best friends. " But she is one of only two, that knows ALL my secrets. Mostly because she like the other one, was my partner in crime in many of those secrets. These are the kind of friends that you will always be friends with because it's too dangerous not to be!
Besides our "wild youth" (relatively speaking) one of the things we share is that we are both Foodies. We have an unriveled love of unique flavors and textures and willingness to try just about anything.
During the 2 1/2 days I was there we did some major eating. One of the places she took me (twice actually) was a small independant resturant called "The Medowlark" She had raved about it! But when we pulled into the parking lot of a non-descript strip mall my heart sank a little. That lasted about 2 mins (the time it took us to park and walk inside) here, hidden in this strip mall was certainately a treasure!
Inside the decor was a charming beatnik,alternative, funky modern art conglomeration. Unique cloth napkins and placemats at each table.The employees matched the decor and so did the food!
The menu, is somewhat small and changes seasonally. It touts mostly salad, sanwiches and soups and read like poetry. No generic terms like mouthwatering, delicious... blah, blah, blah. It gave beautiful discriptions of the fresh,wonderful cheeses and vegetables and spices. There was no need to ask for explanation of any dish, you could imagine exactly what it would taste like just by reading ...no wait you could "almost imagine" because it tasted EVEN BETTER!
There were so many wonderful things there like a grilled portabella sandwich topped with roasted red peppers and Brie grilled to perfection on a beautiful Rye bread. Roasted tomato soup with basil. Garlic Frites with home made catsup (sure to be the topic of a future post). I could go on and on! But, since it is a 10 hour drive it would only serve to torture you. But believe me, if it were not for the cold weather and snow. I would consider moving to Dayton just to be able to eat at this resturant!
One of the dishes I had there was a beautiful beet salad with goat cheese which is half of the inspiration for todays post. The other half is a Ina Garten recipe that I found on Food Network. This sort of a fusion of both. The colors are so bold an lovely. It makes a great presentation that would be perfect for a dinner party or luncheon.
Beets tend to be a "love' em or hate' em" Food. Many people do not like the "earthy" flavor they have. But, the orange and vinegar in this recipe cuts through that and gives them a fresh, bright flavor!
I had originally planned on roasting fresh beets (which I have never done) for this; but, Ina's recipe called for canned beets. If canned beets are good enough for the Contessa, darnit they are good enough for me!
Orange Beet Salad with Goat Cheese
2-15 oz cans of sliced beets,drained
1/4 cup Raspberry Vinegar
1/4 cup Freshly squeezed Orange juice
1 Tbs Olive oil
1 tsp salt
1/2 tsp freshly ground black pepper
1 cup thinly sliced red onion
1 large seedless orange
4 oz goat cheese
1/4 cup chopped walnuts

Wisk together Vinegar, orange juice and olive oil salt and pepper. Place beets and onions in a bowl and pour mixture over top. Toss lightly, cover and refrigerate for at least 1 hour.
Immediately before serving zest orange and set zest aside. Remove remainder of peel and with a sharp knife remove as much of white pith as possible. Segment oranges.
With a slotted spoon remove beets and onions from vinaigrette and arrange on individual serving plates. Drizzle a small amount of the vinaigrette over top. Divide orange segments between each plate and arrange on top of beets. Break up goat cheese into small clumps and arrange on each plate. Grind additional black pepper over entire salad. Top each with orange zest and sprinkle with walnuts.
Notes: For a more substatial dish you could also serve this on a bed of spinach or field greens adding a bit more of the vinaigrette to flavor the greens.

Tuesday, January 20, 2009

Don't Burst My Bubble


I am sure that you expected to open up today's post and find some soup or a casserole or some other cuddle up and stay warm and cozy food. But I wanted something to make me think warm and tropical!

You see, the snow today and all of the cold weather we had last week? That is my fault. I was in Ohio and IN two weeks ago, and it followed me back. I apologize, well except to the kids who are enjoying the day off. To them I say, "Your welcome".

My trip was kind of a disaster. It started off by a miserable drive through endless rain and fog for 9 hours. 20 minutes before I reached my first destination in Dayton, I had an accident. Standing on the side of the interstate I got a chill to the bone that I could not shake for the remainder of my trip.
I won't bore you with the details. But Firetrucks, police cars, a tow truck, a trip to the Emergency room (were I was told I did indeed have a brain and it was mostly intact just a little angry from banging against my skull)insurance companies, rental car agencies,extra days in Dayton when I should have been in IN, a funeral, a whirlwind of trying to seem my entire family in less than 48 hrs,and 13 (very tense) hours of driving back to NC.

When I reached my driveway, I looked down at outdoor temperature gauge on my fancy rental car and it read 47 degrees. "I AM NEVER LEAVING NORTH CAROLINA AGAIN!" at least not in the winter.

So, you can imagine that I was not happy when a few days later, the temperatures here began dropping and definitely not excited to see snow this morning! It's a good thing that I don't have to work today because I do not plan to peak my nose outside my door.

So, though I know those of you who did not grow up with snow and all the kids are enjoying your snow day. I am going to turn up my heat and eat my tropical dish and pretend I am in the Bahamas!

I found a recipe for Ceviche on a blog called The Omnicon after seeing a picture of it on Tastespotting. Besides the beautiful picture what caught my attention was the Tequila in it. I happen to be a big Tequila fan. Sadly though, I did not have any on hand but believe me the next time I make this, I will. I was also intriqued by the sweet potato in this. I was sure (from the picture) it was going to be mango. There are endless variations of fish, fruits and veggies in creviche I am looking forward to trying many more recipes for this wonderful Latin American dish.

Important Note: I know that everyone is concerned these days about food contamination. So , I did some research about this. In this recipe (like most Ceviche recipes) the acid in the lime juice denatures the proteins in the shrimp and gives it the texture and appearance of being "cooked". It does also kill bacteria. Though it may not kill ALL of the bacteria. The FDA states that shellfish that is frozen to -31 degrees for 15 days is relatively safe for raw consumption. For this reason I would only use commercially frozen shrimp. It should also be noted that pregnant women or anyone with a compromised immune system should NOT eat raw seafood.

If you still feel uneasy about eating raw seafood you can lightly steam the shrimp then marinate it in the lime juice for about 30 minutes.


In Denial of Winter Shrimp Ceviche


1 lb thawed raw shrimp, cleaned and roughly chopped
10 oz lime juice
1 cup cubed sweet potato
1/2 cup diced red onion
2/3 c chopped cilantro

1/4 cup,diced red/yellow peppers
2 Jalepeno peppers cleaned and sliced
1 can coconut water (also called coconut juice,NOT coconut MILK)
1 shot tequila (optional)
1/4 c coconut, toasted

Place chopped shrimp in a ziplock bag and cover with lime juice. Squeeze out all the air and roll up bag so that all shrimp is completely covered in lime juice. Let sit in fridge for 3-4 hours.


Placed peeled,diced sweet potato in a pan of boiling water and cook until tender. (15-20 mins) drain and cool.


Drain shrimp, reserving 1/4 cup of lime juice. Combine with remaining ingredients (except toasted coconut). Chill for 1 hr. Place in beautiful glasses and sprinkle with the toasted coconut. This can be eaten by itself as is or enjoyed on a tortilla or crackers.


Thursday, January 01, 2009

Always a Yankee


I have lived in the South for most of my adult life (GA for 5 yrs and here for 13) and I have adopted many Southern customs but for New Years my Yankee roots are showing.

I know that here in the South most people eat Collard greens or Black eyed peas for luck on New Years. But in Indiana cabbage is the traditional "lucky" food for the New Year. My family usually makes a Corned Beef and Cabbage Soup to get our dose of luck. But this year I thought I would try something a little different.

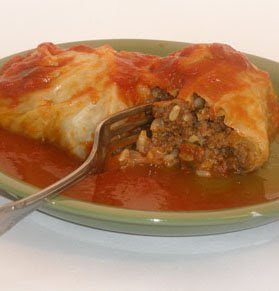
I started perusing my usual recipe sites looking for a recipe containing cabbage and the very first thing I came across was Stuffed Cabbage. Mmm, simple flavors. Tomatoes, ground beef, rice and of course Cabbage. Perfect!

The most difficult part of this dish is separating the cabbage leaves. But this task is simple with just a pot of boiling water. Bring large pot of water to a boil. With a sharp knife remove the core of the cabbage leaving the rest of the cabbage intact. Once water is at a full boil drop in head of cabbage. With a pair of tongs begin carefully coaxing off leaves one a time and remove from water. At this point leaves should be just flexible enough for rolling. You do not want to actually cook the cabbage otherwise it will be be flimsy and tear when you are rolling. I promise, it sounds way more complicated than it is.

Simple Stuffed Cabbage


8 whole cabbage leaves


1lb ground beef


1cup cooked rice


1-8oz can tomato sauce


1-15oz can tomato sauce


1/2 cup chopped onions


1/4 cup chopped green peppers


2 tsp minced garlic


2 TBS Brown sugar


1/2tsp Allspice


Salt and pepper to taste


In a large skillet brown ground beef along with onions, peppers and garlic. Drain well. Combine ground beef and 8 oz can of tomato sauce. Season with salt and pepper to taste.


Place approx 1/2 cup of ground beef mixture into the center of each cabbage leaf. Fold 1/2 of leaf over meat and tuck in ends. Roll the rest of the way up and place each one seam side down in 8x8 baking pan. (spray pan with cooking spray first) Mix together remaining tomato sauce, brown sugar and allspice. Pour sauce over cabbage rolls. Cover tightly with foil. Place in the oven for 45-55 mins. (45mins for cabbage that is al dente longer for softer cabbage) Uncover and spoon sauce over rolls once or twice during baking.

Tuesday, December 23, 2008

Who Cut the Cheese

pc230037.JPG

I read an article in the food section of my local newspaper a month or so ago about how Cheese Ball has a bad wrap. In my family Cheese ball is a coveted snack that Mom only makes on special occasions. Christmas, New Years an occasional party throughout the year. Now granted this Cheese ball isn't the classic neon orange cheese covered in nuts. This is a recipe that was passed down to me from my Mom. I have no idea where she got it but once you make it will become your "go to" cheese ball recipe. If you take it to a party it will become what you are always requested to bring.

My Mother-in-law (I 've been divorced for 10 yrs but I always joke that I got my in-laws in the divorce) does not even form it into a ball. A couple of months ago my sister-in- law was telling me how she made " that cheese dip" and how she took it to a football party and shaped and decorated it to resemble a football and that at other parties she has shaped it to fit the theme. I was asking her about the recipe and she said "You know, the cheese dip that my mom always makes with the meat and onions and cream cheese!"

"You mean Cheese Ball? Your Mom got that from my Mom when I was dating your brother!" Then I busted out laughing. See, I don't think recipes are meant to be guarded. I think they are meant to be shared. ,I find nothing more flattering than someone making something that I have made for them that they liked. Plus, this frees me up to make something new for them!

But I digress, in my family we don't think orange cheese with nuts when someone says cheese ball. This is one of the first thing my kids ask me if I am going to make for the holidays.

It's very easy, though requires a bit of chopping. This step is faster if you have one of these food chopper thingys.

pc230001.JPG

You probably could also pulse it a few times in a food processor and get a pretty good result but for years I tediously diced the meat into perfect little squares (I am over that now). Over the years I have tried different types of meats in it. All of them taste good ,but I find Pastrami to be my favorite. Sometimes they don't have that so I usee I use Corned beef as my second choice. When my Mom started making it she used 2 packets of the "Budding" beef. ( you know the inexpensive hanging envelope type packets of very thin sliced meat) but I find that one package (8oz) of the "deli selects" is the perfect. You should make this at least an hour before you serve it to give the flavors time to marry but it can be made 2 days in advance (good luck keeping everyone out of it).

Mom's Cheese Ball


8 oz thin sliced Pastrami or Corned beef


2 Pkgs cream cheese, softened


2 Tbs Worcestershire Sauce


2 bunches Green Onions


Finely chop onions (all of white and about bottom third of green). Place in bowl with Cheese and worcestershire. Finely chop all of meat and add 1/2 to bowl (reserving half) Mix together well and using a spatula bring mixture together to begin to form a ball (does not have to be perfect at this point) Spread remaining meat out on large cutting board. Turn cheese out onto meat and begin rolling around to cover in meat. Once most of meat is covered shape into a nice ball and place on a plate you can the use your fingers to place small bits of meat to cover gaps and make it look pretty. (Remember the bottom will not be seen). Chill for at least 1 hour and up to 2 days. Serve with crackers. Wheat thins are my favorite but Club and Triscuts are very good with it also.


Saturday, November 29, 2008

Magical Beans


OK, I finally got off my lazy rear end and dug out my homemade lightbox. I am tired of my pictures looking ...well, tired. Plus, this project for homemade vanilla extract deserves it!

I found this a little over a month ago on Travelers Lunchbox and thought "HOW COOL IS THAT?" Who would of thought that making your own vanilla extract would be so easy.

So, I jumped on Ebay and one week and $15 bucks later I had a 1/4 pound of Tahitain Vanilla beans. I had most of a bottle of vodka left over from a party and I was in business.

I split about a half a dozen beans and plopped them into the vodka. My next step was finding some cute little bottles (which actually was the hardest part). I finally found them at Michaels. Several weeks later I have pleanty of vanilla extract for my holiday baking and hmmmm... wouldn't these make cute gifts?

The pictured bottles still need a little more time before they are quite ready to use but I was too excited to wait any longer to share this. You want the extract to be a nice rich brown color.

There is not an exact science to this. More beans = faster and richer extract. Melissa at Travelers Lunchbox also suggests jumpstarting your homemade extract with a bottle of good quality storebought extract. If you use vanilla beans on a regular basis you can use the left over beans. Again, this will result in a slower production.

Here is the coolest part of this. Once you start a bottle of vanilla extract you simply keep topping it off with additional vodka and you will have an unending bottle of vanilla! You can add additional vanilla beans as you use them. As long as a bean still has the vanilla scent it still has life. If you have used a whole bean in your recipe(such as boiling it in milk) just give it a rinse before adding to the bottle. If you don't ever used vanilla beans in cooking you can add a couple of new ones split down the middle every once in awhile.


Everlasting Vanilla Extract


1 L Vodka (any brand)
6-8 Vanilla beans

Split beans down the middle with a sharp knife. Drop Beans into Vodka. Store in a cool dark place. Once a week give bottle a bit of a shake. In 6-8 weeks you will have a rich bottle of extract.

Once extract is established pour a few ounces into a smaller bottle for every day use and top off larger bottle with additional vodka. Continue to do this as you use your vanilla.

Friday, November 28, 2008

It's a Beautiful Life


One of the disadvantages to my job is 911 does not close. This means that SOMEONE has to work on the holidays. This year that someone is me (along with a few other people). Because our schedule is on a 4 week track and Thanksgiving and Christmas are exactly 4 weeks apart, my shift gets the distinction of working BOTH holidays this year. But, someone has to do it and next year it will be someone else.
Don’t feel TOO bad for me though. One thing it didn’t do was prevent me from eating! It started early in our shift when my partner and I popped into the resturant my daughter (yes, she had to work too) works at for breakfast and crossed our fingers that we would not get a call before getting our food. Not only did we manage to get our food and swallow it whole actually eat it; but, we were seated next to a very nice couple who not only didn’t complain about the loudness of our radios, but thanked us for doing our job (which is not expected but always greatly appreciated). When we went to pay our bill were told that they had already paid for it. Wow! I have to say that made our day!


But no, the eating did NOT stop there. The ER staff all brought food to share so each time we dropped off a Patient we popped into the lounge to partake in the feast that was there. Downtown at EMS base we also had a potluck dinner and between the cooperation of the citizens of Cumberland county (by not calling 911 too often), the dispatchers, the coordination of the supervisors and us covering one anothers zones, each crew managed to rotate in to grab a quick plate with all the traditional fixins. Though we had gotten our fill, we had invites from the fire stations and even a few homes where we went to pick up patients. So, trust me we were NOT going to starve!


On top of all this, I prepared this Buffalo chicken Dip that I found on the Big Red Kitchen. This is the same place I found the recipe for the Jalapeno Popper Dip. Seems like Robin Sue has a knack for great “man food” ( Though I have not heard any women complain either). I strategically placed this in the EMS room (where we go to write our reports after we drop off our patients) for the crews to snack on between calls. Like the Jalepeno dip, this is like Buffalo wings deconstructed. I LOVE IT! I swear, both of these dips taste like the real thing.


I made a few changes to this mostly because I made a much bigger quantity of it and for convience (you know me I used a pre-cooked deli chicken). I had enough for a large bowl for the ER and two smaller ones for the EMS room and our dispatchers (never hurts to try to make them happy) The one thing I did not do was heat it. I pulled out a small amount after I mixed it together and zapped it in the microwave for a few seconds and honestly I did not like it that way. But at room temperature it was awesome. I think this is just a personal preference so try it and decide for yourself.


My shift ended at 8 pm and I met up with my kids along with their respective signifigant others and a few other friends thrown in. We spent a few hours playing games and I went home and fell into bed exhausted. But before I went to sleep I thought about my blessings. My children, my family and friends and a job that I love. Though my Thanksgiving may not have been traditional (much like my entire life) that does not mean it was not happy.

I hope every one had a wonderful Thanksgiving!


Buffalo Chicken Dip

3 cups cooked chicken,shredded
2- 8oz pkgs softened cream cheese
1-12oz bottle Buffalo Wing sauce (I used Franks Red Hot)
1-16oz bottle Chunky Bleu Cheese Dressing
2 cups shredded Cheese (I used 3 cheese mexican blend)

Mix all ingredients together. Serve at room temperature (or warmed if desired) with Tortilla chips and celery.

Tuesday, November 25, 2008

Try It, You'll Like It


Let’s take a poll. Who likes cranberry sauce? Ok for all of you out there who said no or EWWW,tell me this… Have you EVER had anything but that icky jellied stuff out of a can?

Trust me that is NOT cranberry sauce. If you tried homemade cranberry sauce I would bet that at least half of you would not turn your nose up at it again. If you said you DO like cranberry sauce, you will be in heaven when you see how quick and easy it is to make. When you taste it, you will swoon!You will be perplexed as to why anyone would EVER buy that canned stuff.

If you are the person who always brings the soda or rolls to holiday dinner because your family does not trust you to cook or you want to impress your Mother-in-law, offer to bring this. You will feel smug when people start asking you for the recipe!

Kickin Cranberry Sauce

12 ounces fresh cranberries, picked over and rinsed

1 1/2 cups granulated sugar

1/3 cup water

1/3 cup fresh orange juice

1 tablespoon minced fresh ginger

Finely grated zest from 1 orange

2 tablespoons of finely chopped crystalized ginger (optional)


Combine all of the ingredients except crystalized ginger in a heavy saucepan. Cook over medium heat until the berries pop open, about 10 minutes. Remove from heat.

Skim foam off the surface with a metal spoon and discard. Cool to room temperature. Stir in crystalized ginger. Refrigerate, covered, for up to 3 months.

Monday, November 24, 2008

Pardon Me Waiter, There Is A Foot In My Soup


After seeing this picture, I want to see a show of hands ...How many people want to come for dinner???? I know it looks gross, but believe me you do.

Actually I used these chicken feet to make chicken stock. I had read about using them last year but I never thought I would actually be able to find them. But, I went to "Compare and Save" (which is a Hispanic grocery store in the Bonnie Doone area), there they were!

I went in there to check out their produce and see if I could find anything new and interesting. There were lots of things I want to try there but once I saw the chicken feet I was distracted. I had several chicken carcasses in my freezer that I had been meaning to make into stock so this was a good reason to get on that.

Adding chicken feet to your stock makes it richer and thicker. Chicken feet contain a lot of gelitan which gives your stock a velvety mouthfeel. Similar to when you add butter to pan sauce. It's hard to explain but you definately know that it is something good.


I just boiled the chicken feet for 5 mins then cut off the claws and tips of the toes and added them to the rest of my carcasses and proceeded with my ususal method of making stock that I posted last year but according to Elise at Simply Recipes you can make it with just the feet.

It is so nice to have home made stock in my freezer. Flavorful stock is the secret to making a soup that taste like it cooked all day but can actually be thrown together in just a few minutes. I even went as far as making a couple of containers of "soup base". I froze some shredded chicken in stock so that I can pull it out and make a quick Chicken and rice or Chicken Tortilla or my favorite, Avgolemono.

Avgolemono is a Greek lemon soup. I posted my own version of this last year but it is worth repeating. Don't let not having homemade stock keep you from making this. It is still great with store bought stock. This is so good for a cold day or a great comfort food for when you are feeling under the weather.


Avgolemono
Avgolemono

6 cups Chicken Stock
1 cup shredded Chicken(optional)
3 egg yolks
2-3 lemons
1/2 cup Orzo
1/3 cup finely diced carrots
Salt and Pepper to taste

Bring Chicken stock to boil. Add in Orzo and carrots. Continue to boil 8-10 min until Orzo is Al dente.Add in Shredded chicken. Lower heat to simmer. Place the egg yolks into a small bowl. Zest 1 of the lemons into eggs then squeeze in the juice of the remaining. Beat lightly. Temper the eggs by slowly stiring in about 1/2 cup of the broth a little at a time. Slowly stir the egg/broth mixture back into the remaining broth. Simmer for 5 min. Do NOT let mixture come to a boil as it will cause the eggs to separate and though it still tastes good its not very pretty when it does this. If you have left overs (and I doubt you will) be sure to heat very slowly for the same reason.

NOTE: Orzo is a rice shaped pasta. You can replace this with rice (and I have in a pinch, but I really prefer the Orzo) but you will have to increase the cooking time to about 25 mins.

Saturday, November 15, 2008

Taking It Apart and Putting It Back Together

jalepeno-popper-dip.jpg

I happen to really like Jalapeño Poppers but I have an aversion to deep frying. One, because I hate the smell of grease in my house and two, because besides being a messy cook I am also a cook that burns herself a LOT. Working with large amounts of hot oil is a recipe for disaster. I do, occasionally get the frozen kind that you bake and they are pretty good, but mostly I just get them when I go out.

But when I found this recipe for Jalapeño Popper Dip on a blog called Big Red Kitchen. I knew I had to try it. It is all of the flavor of Jalapeño Poppers without the frying! Sort of Jalapeño poppers deconstructed.

I took this to my friend Evie's bachlorette party and had a good response from the girls. But when I took it to work ,the guys really scarfed it down and everyone wanted the recipe!

This is a perfect "Sunday, watching the game" dip. You can serve it with Crackers (Ritz work well),bread or the guys really dug the "scoops" variety of tortilla chips. Get it? Dug? Scoops......never mind. You can make this mild or turn up the heat as you like.

I made just a few minor changes to this recipes and I used the "Lite" versions of cream cheese and mayo. I replaced the canned jalapeños with 4 fresh but the recipe does not reflect that because honestly, I think you will get a stronger Jalapeño flavor with them. Next time I plan to add both(but I really like a kick).

Don't forget when working with fresh Jalapeños that the heat lives in the seeds and membranes of the peppers. For less heat you should remove them for more heat leave them in. (I usually leave some but not all) I also recommend wearing gloves while working with them. The oils in the peppers can be difficult to wash off and you might get a not so friendly reminder of that later in the day when you touch your eyes or nose.

Happy Snacking!

Jalapeño Popper Dip
2- 8 ounce packages cream cheese, room temp
1 cup mayonnaise
1 cup shredded Mexican blend cheese
1/2 cup Parmesan cheese
1- 4 ounce can chopped green chilies-undrained
1- 4 ounce can sliced jalapeños-undrained

1-3 fresh jalapenos - cleaned and chopped

1 cup panko bread crumbs
1/2 cup Parmesan cheese
1/2 stick butter, melted

In a food processor add the first 6 ingredients and process until smooth. Spread the dip into a greased 2 quart casserole. In a bowl mix bread crumbs and the other 1/2 cup of Parmesan cheese. Pour melted butter over top crumb mixture and mix well. Sprinkle crumb mixture evenly over the dip and bake in a 375° oven for about 20 minutes until the topping is lightly brown and dip is slightly bubbly. Do not overheat or the oils in the mayo and cream cheese will separate .

Notes: The panko bread crumbs can be replace with crushed saltines or crushed Ritz crackers (I would reccomend Ritz).


Baking this in a "flat" casserole dish rather than a deep one is preferred to achieve more topping to cheese ratio when eaten.


Please NO powdered parmesan cheese product...ick!

Friday, November 07, 2008

Taking On The Establishment


p9300065.JPG


I love coffee, I am not really a coffee-aholic but I do have to have at least one (large) cup a day and I usually have 2, occasionally 3. OK, maybe you could say I AM a bit of a coffee-aholic. But I can stop anytime I want. OK, I can't stop but I can live with just one cup a day.

I would like to say I am a coffee connoisseur. I do love good coffee and I recognize it when I have it. But, I rarely meet a cup of coffee I absolutely won't drink. I guess I would have to say I am more of a coffee slut than a connoisseur.

This comes from years of working EMS. Drinking bad hospital coffee or Convenience Store coffee to stay awake on night shift.I will go as far as reheating coffee I have made earlier in the day (sometimes even the day before). I know, it's gross but sometimes you need a cup of coffee before you are capable of MAKING coffee.

In the morning I prefer my coffee hot but at other times of the day I like it cold. This has me stopping at Starbucks and dishing out 4 bucks on a Iced Mocha WAY more often that my budget likes. But you know us addicts ...we will sell our souls for a fix.

I have tried making Iced coffee at home. You know, with that left over pot from last week this morning. I can't say that it was very tasty but yes I drank it anyway.

When I came across this method for cold brewing coffee I was intrigued. I did not know that was even possible. So, I decided to give it a try. I was amazed by how good it was. When you cold brew the coffee you don't extract as much of the oils and acid in the coffee which is part of what makes it bitter the longer it sits. You do however get a wonderful smooth flavor.

This is an excellent method for making iced coffee. The only downside it that you have to plan ahead. The good news is it will keep in the fridge for several days so you can keep it on hand. I also found that it makes a excellent quick cup of hot coffee when heated (Much better than the reheated stuff from yesterday). There is some debate about the caffeine content of cold brewed. When I researched it I found some sources say it is pretty much equal to hot brewed and others that say it has a bit less. I guess with the amount I drink, it would do me good to have a little less caffeine anyway.

The original directions I found for this directs that this be done in a jar or other glass container with a lid. But I found my French Press (which I think by far makes the best hot coffee) to be really convenient for this because it has a strainer built right in. If you don't have a French Press you should run right out an buy one you can use a jar and a fine mesh strainer or even a paper coffee filter (though this takes a little time).

The instructions advise using a nice blend of coffee coarsely ground coffee. I plan on doing that at some point but I think just your average french roast coffee bought at the grocery store results in a pretty good finished product.


Cold Brew Coffee


2/3 cup ground coffee


3 cups water


Place Coffee and water in French press or glass jar with a lid. Let stand for 12 hours. Strain twice (I found the second strain unnecessary with the french press).This "base" can be stored in the fridge for up to a week. Serve over Ice


I prefer one part milk/cream to 2 parts coffee and I often add flavored creamer or sometimes a little chocolate syrup. You can also experiment with your favorite flavored syrups.


Believe it or not sometimes I do drink something beside coffee though. I made the mistake of trying The Carmel Apple Spice the other day. Mistake, because now I would like to drink it everyday! (Again we are back to my wallet protesting) It is like a spiced apple cider with carmel it is SO good!

So, last week I watched them make it and guess what? It is SO easy to make and they sell the syrup there at the store. For the cost of 2 drinks in the store you can make enough for a party and I promise you it will be a hit. My friend Savanna made it for her husbands change of command ceremony (which was outside in the morning and COLD) and put it in a crockpot to keep it warm. Every time the lid was lifted the aroma was heavenly!

Carmel Spiced Cider


6 oz Apple juice or cider


1 oz Cinamon Dulce Syrup


1 tsp Carmel Ice cream topping


Whipped cream and cinnamon for garnish


Heat juice/cider on stove in in microwave to desired temp. Add Cinamon dulce syrup and carmel topping. Stir, Top with whipped cream with a little carmel drizzled over top and sprinkled with a dash of cinamon.

So, while I am here trying to put Starbucks out of Business I will bring back a recipe that I posted last year for "Better than Starbucks, Cranberry Bliss Bars"Just a warning though, don't make them if you are not having a party or taking them somewhere. You don't want a whole pan of these in your house because they are TOTALLY addicting!

cranberry-bliss.JPG

Wednesday, October 22, 2008

If You Can't Post Something Nice, Don't Post Anything at All

pa110040.JPG

Like I said last week;I have been struggling the photography of my dishes lately. I blame this mostly on the dishes themselves. They just don't lend themselves to being aesthetically pleasing which has nothing to do with the taste of them. But when I made "Rack of Lamb" (for the first time) last week and my pictures came out at best "boring and lacking interest" I had to admit that I have gotten lazy complacent about photographing my food.

In my defense, the food I blog about is the actual meals I am cooking for my family. It's hard enough to find the time to get a meal on the table, let alone set up a photography studio everytime I cook. I know it will shock you but, dinner at our house does not always mean a nicely set table. Not to mention good lighting.

I also do not own (much to my dismay) a fancy camera. I use a point and shoot type which is great for natural light but pictures that require flash have harsh lighting and a yellowish cast. If you look closely at my pictures (the good ones) you will often notice my backyard and/or deck in them.

It's getting to be the time of year when natural light at dinner time would mean eating at 4pm. Last year I constructed a "light box" and bought a mini tripod to try to combat this and they work pretty well. But, this means dragging it out everytime (again, that time thing) and often results cold food by the time I am done. Not to mention the rolling eyes of my family while they sit at the table waiting for me to finish.

I know, "Excuses, Excuses!" So I was determined today to post something with a nice picture. I have a bunch of good recipes I want you to try but this one is the only one for awhile that I have decent shots of .

This is a recipe for Chicken Tortilla Soup. I saw a recipe for it on Mygourmetconnection.com that had lime ....mmm, lime! I made a couple of changes to it and came up with a killer soup that my co-workers gobbled up last week. I love the zing that the lime adds to this and my replacement of the jalapenos with Chipolte Peppers in Adobo gave it just the right amount of heat. I hope you enjoy this as much as my co-workers did!

Chicken Tortilla Soup with Lime


1 1/2 cups diced onion
2 Tbs minced garlic
2-4 chipolte peppers in Adobo sauce
1 Tbs olive oil
1 cup crushed Tortilla chips
1 quart chicken broth
1 Tbs cumin
1 tsp coriander
1 tsp dried oregano
1 14 oz can "fire roasted" tomatoes
1-14oz can crushed tomatoes
2 cups frozen corn
1 can black beans

4Tbs lime juice


zest of one lime


1/4 cup chopped cilantro


Heat olive oil in a heavy stock pot or dutch oven (I love my cast iron) over medium heat. Add the onions and saute until softened. Add garlic and saute 1 minute more. Add the crushed tortilla chips, toss and toast lightly. Chop up Chipoltes(they will be very soft and sort of like mush)and add, along with a couple TBS of the sauce

Add the chicken broth, tomatoes, spices,corn,beans(with juices)and shredded chicken and simmer for about 5 minutes. .

Reduce the heat and stir in the shredded cheese and Half and Half. Add lime juice, lime zest and cilantro. Stir gently until cheese is melted and well distributed.

Ladle soup into serving bowls add a couple of crushed tortilla chips sprinkle with with additional cheese and a dollop of sour cream.

Notes: Tortilla chips with "a hint of lime" go great with this. Chipolte peppers in Adobo can be found canned in the hispanic foods isle.

pa110024.JPG